Lume Cube Panel GO Review
The Lume Cube Panel Go is a portable camera accessory that offers extra light in nearly any situation and helps you make the most of your travel photography.
Our Verdict
Save time. Get access to brief summaries of our reviews so you can browse and make decisions more efficiently.
Pros
- Time indicator for battery life
- Wide spectrum of color temperature and intensity
- Can be used on battery power or wired
Cons
- Larger lenses can cause shadows when mounted to camera
- Setting adjustment dial is easy to hit accidentally
- Hot shoe mount padding comes off easily
Technical Details
-
Weight (oz)
4.44 oz (125.9 g)
-
Dimensions
2.6 in x 4.8 in x .3 in (6.6 x 12.2 x 0.8 cm)
-
Manufacturing Country
China
-
Warranty Information
Buying Options
Full Review
Photography simply isn’t possible without light. Without anything to dance across and illuminate your camera’s sensor, images wouldn’t exist. Given this fact, bringing a portable light on a trip in which you’ll be taking photos seems like a no-brainer. The Lume Cube Panel Go seems like a contender for this job due to its small size and powerful LEDs, but will it live up to the hype or have us scrolling on Amazon for a replacement? Let’s dive in.
Materials & Aesthetic
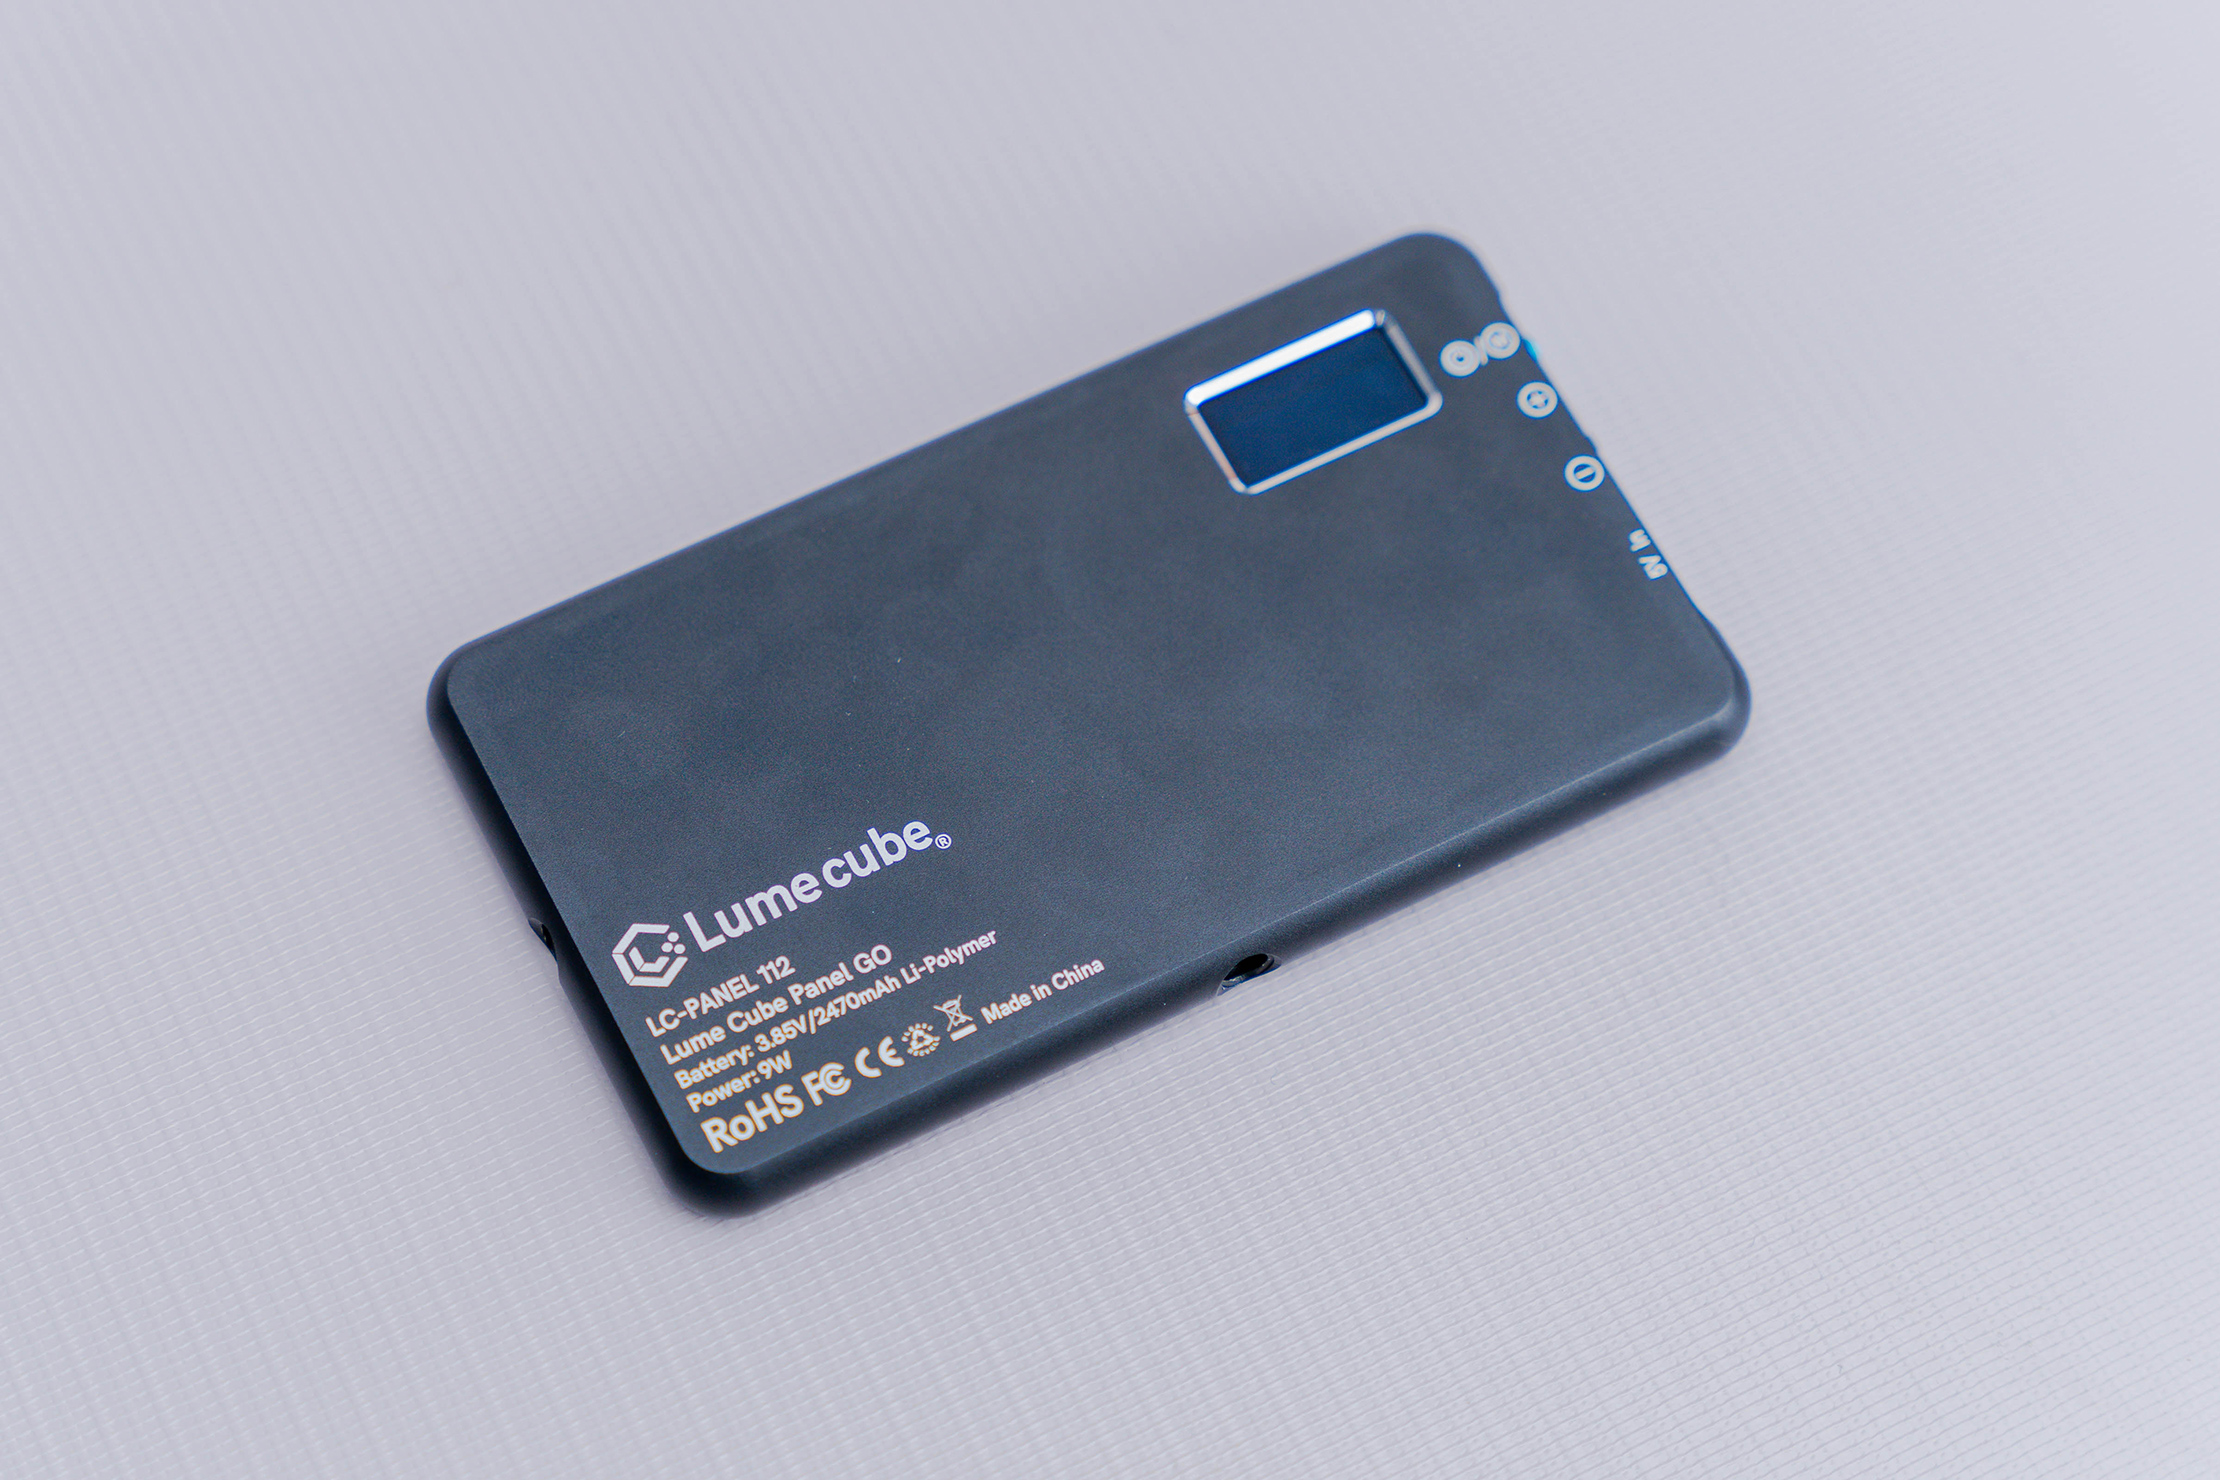
Starting with the exterior, the Lumecube Panel GO’s shell is crafted from hard metal. We aren’t exactly sure what material, but it feels like some sort of aluminum. It’s matte black, which is sleek and looks professional.
The logo’s white lettering is pretty large on the back of the light, but we don’t really mind. It’s placed above the battery and power information, so it blends in nicely and is oddly satisfying alongside the technical information.
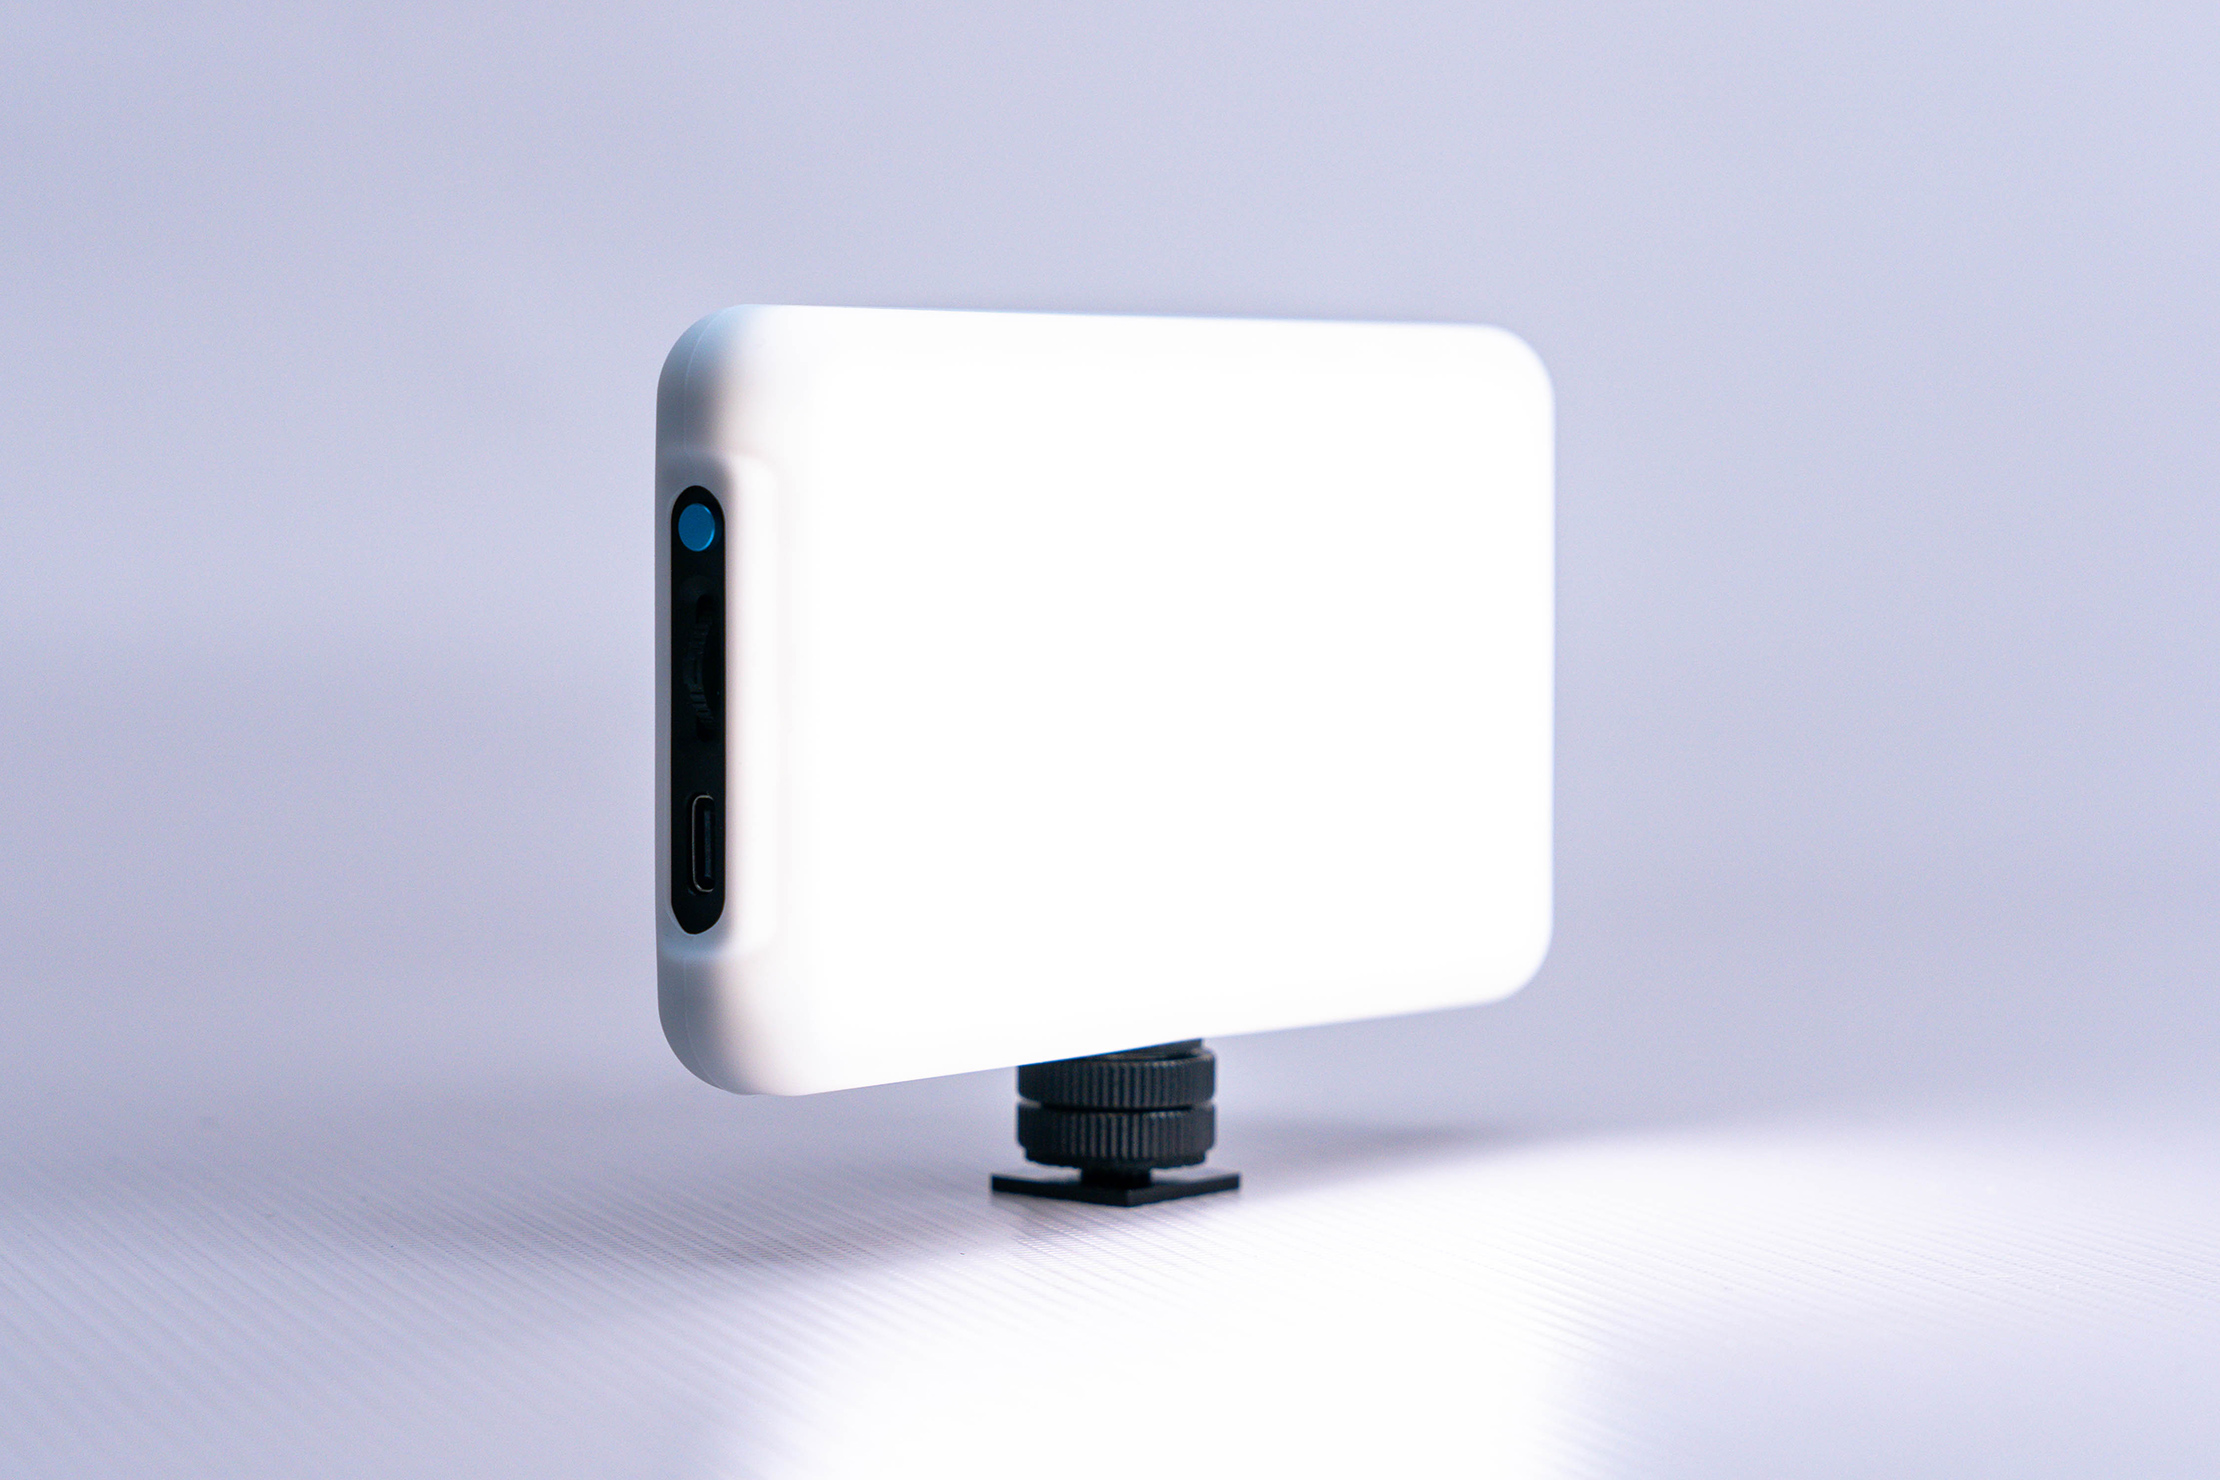
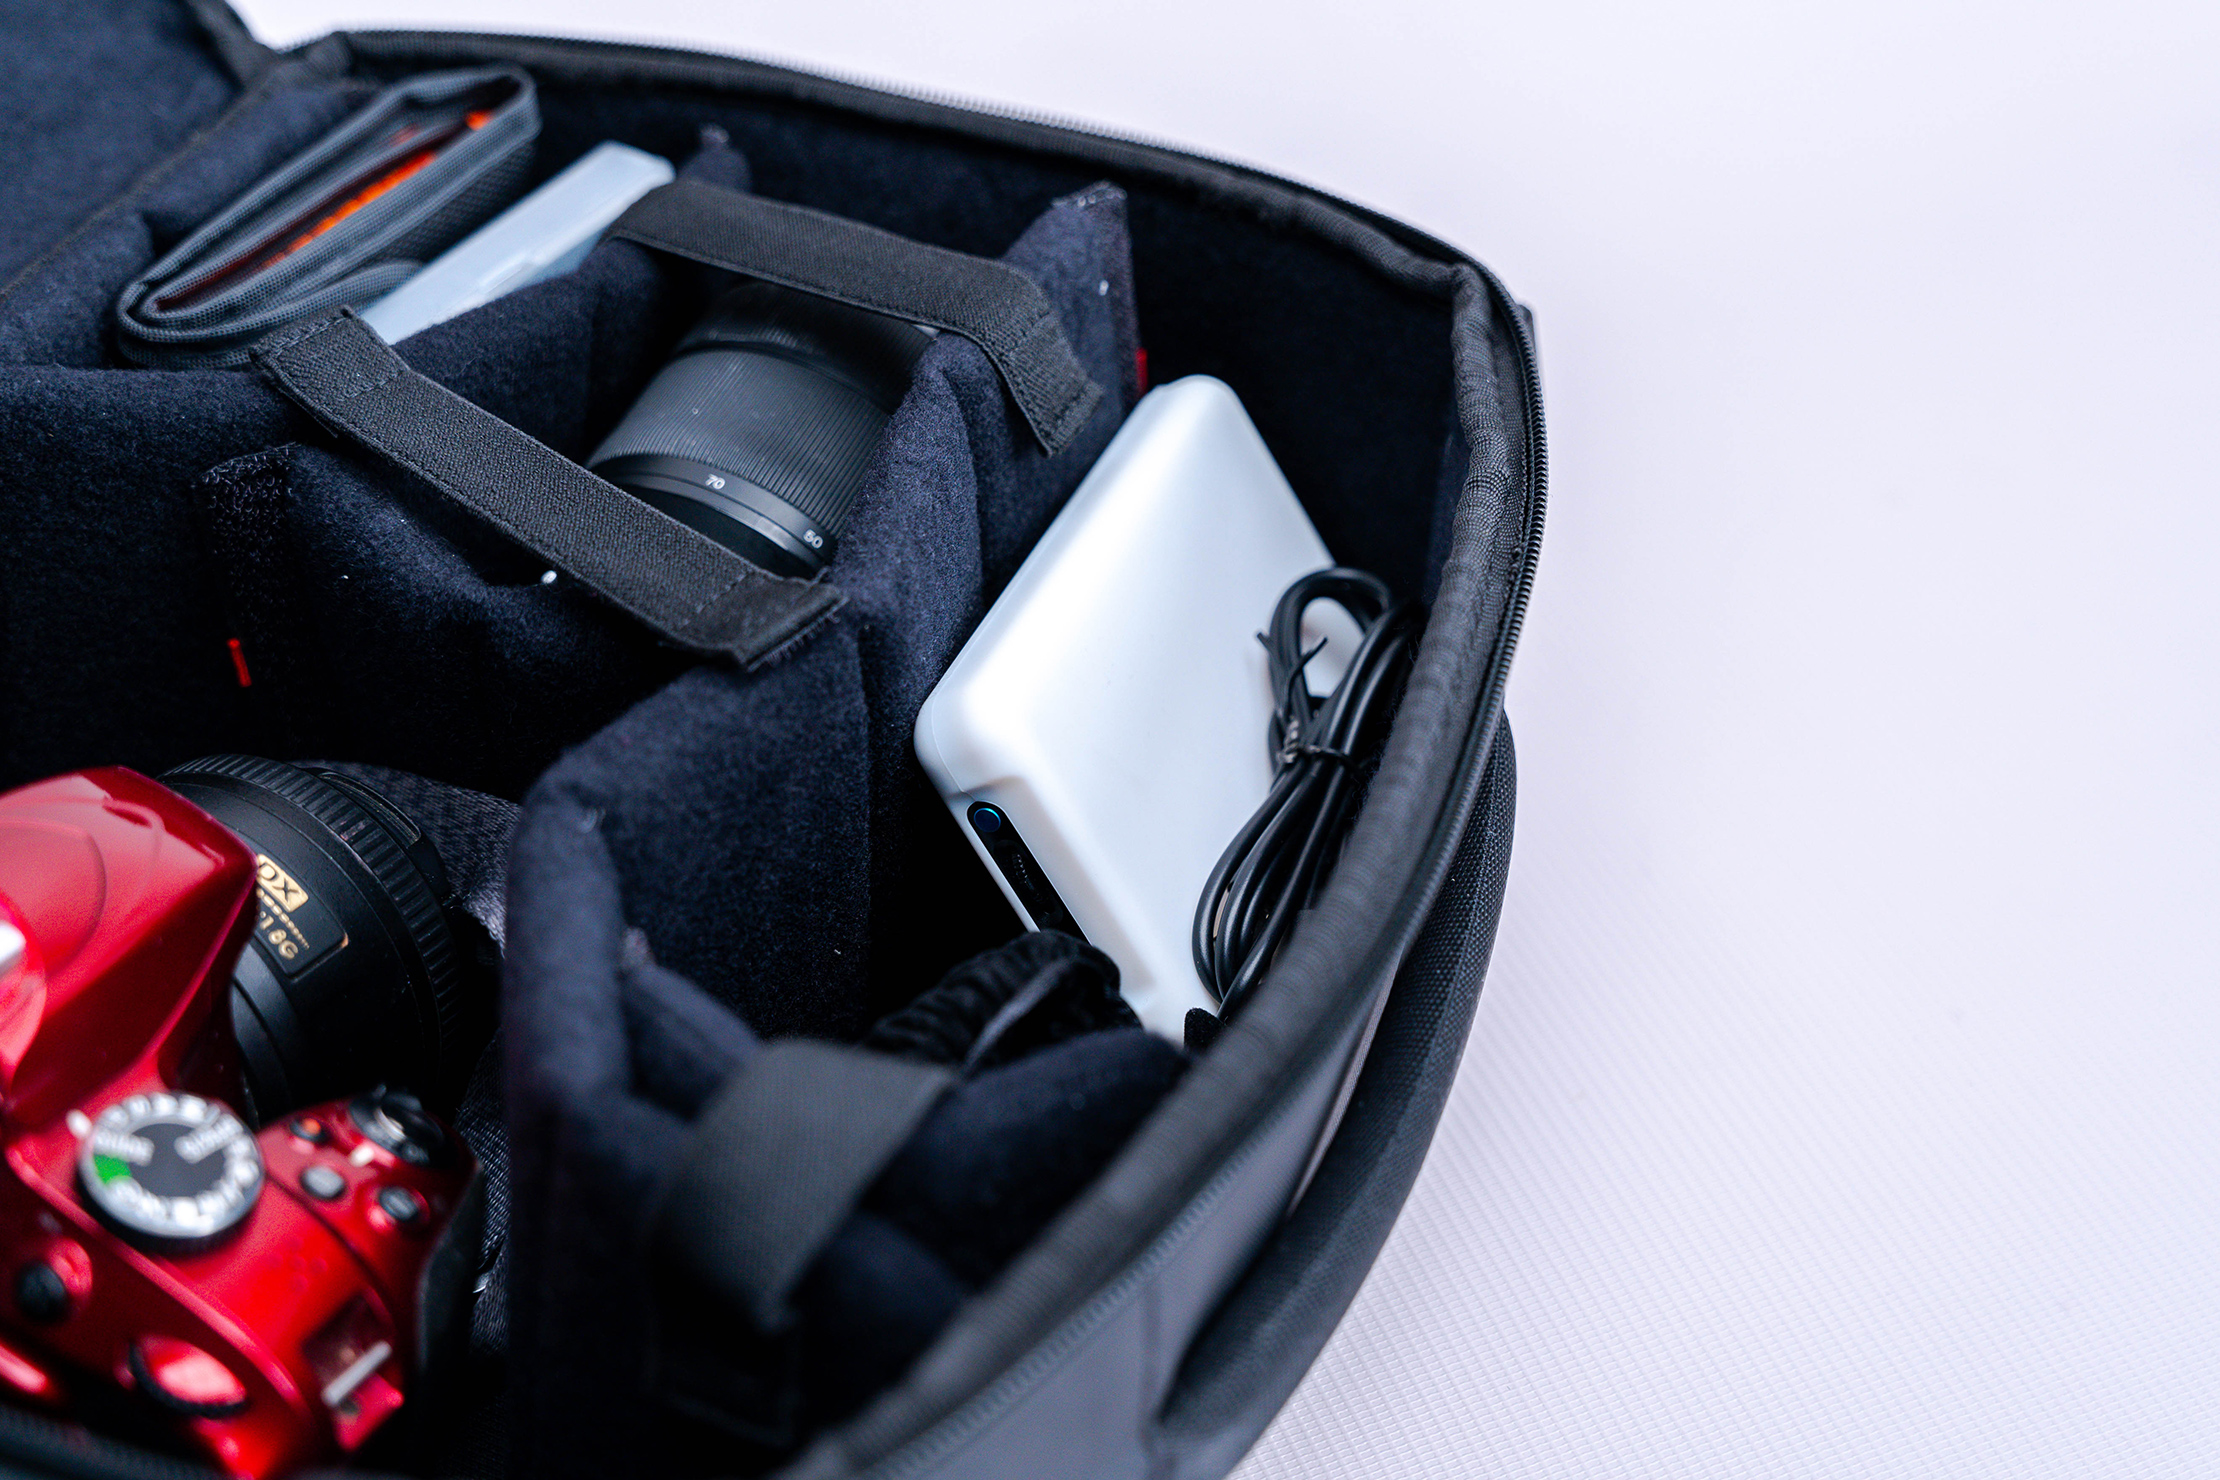
As far as size goes, the panel is just under five inches (12.7 cm) long, just under two and three-quarter inches (6.9 cm) tall, and a third of an inch (.85 cm) thick. It’s roughly the size of a cell phone and fits into the hand nicely. It can fit inside a small sling with ease and slides nicely into an interior daypack pocket.
The actual light takes up almost one entire face of the panel apart from a few centimeters of protection on each side. The front pane is made from plastic and gives a little when you put pressure onto it. We don’t feel like it’s fragile per se, but it isn’t nearly as durable as the metal casing. It has a slight texture to it and almost looks frosted.
You can see the yellow phosphors that produce the light, which are lined up in 8 rows of 14. It looks a little funky when not turned on, but this is par for the course as far as LED light panels go.
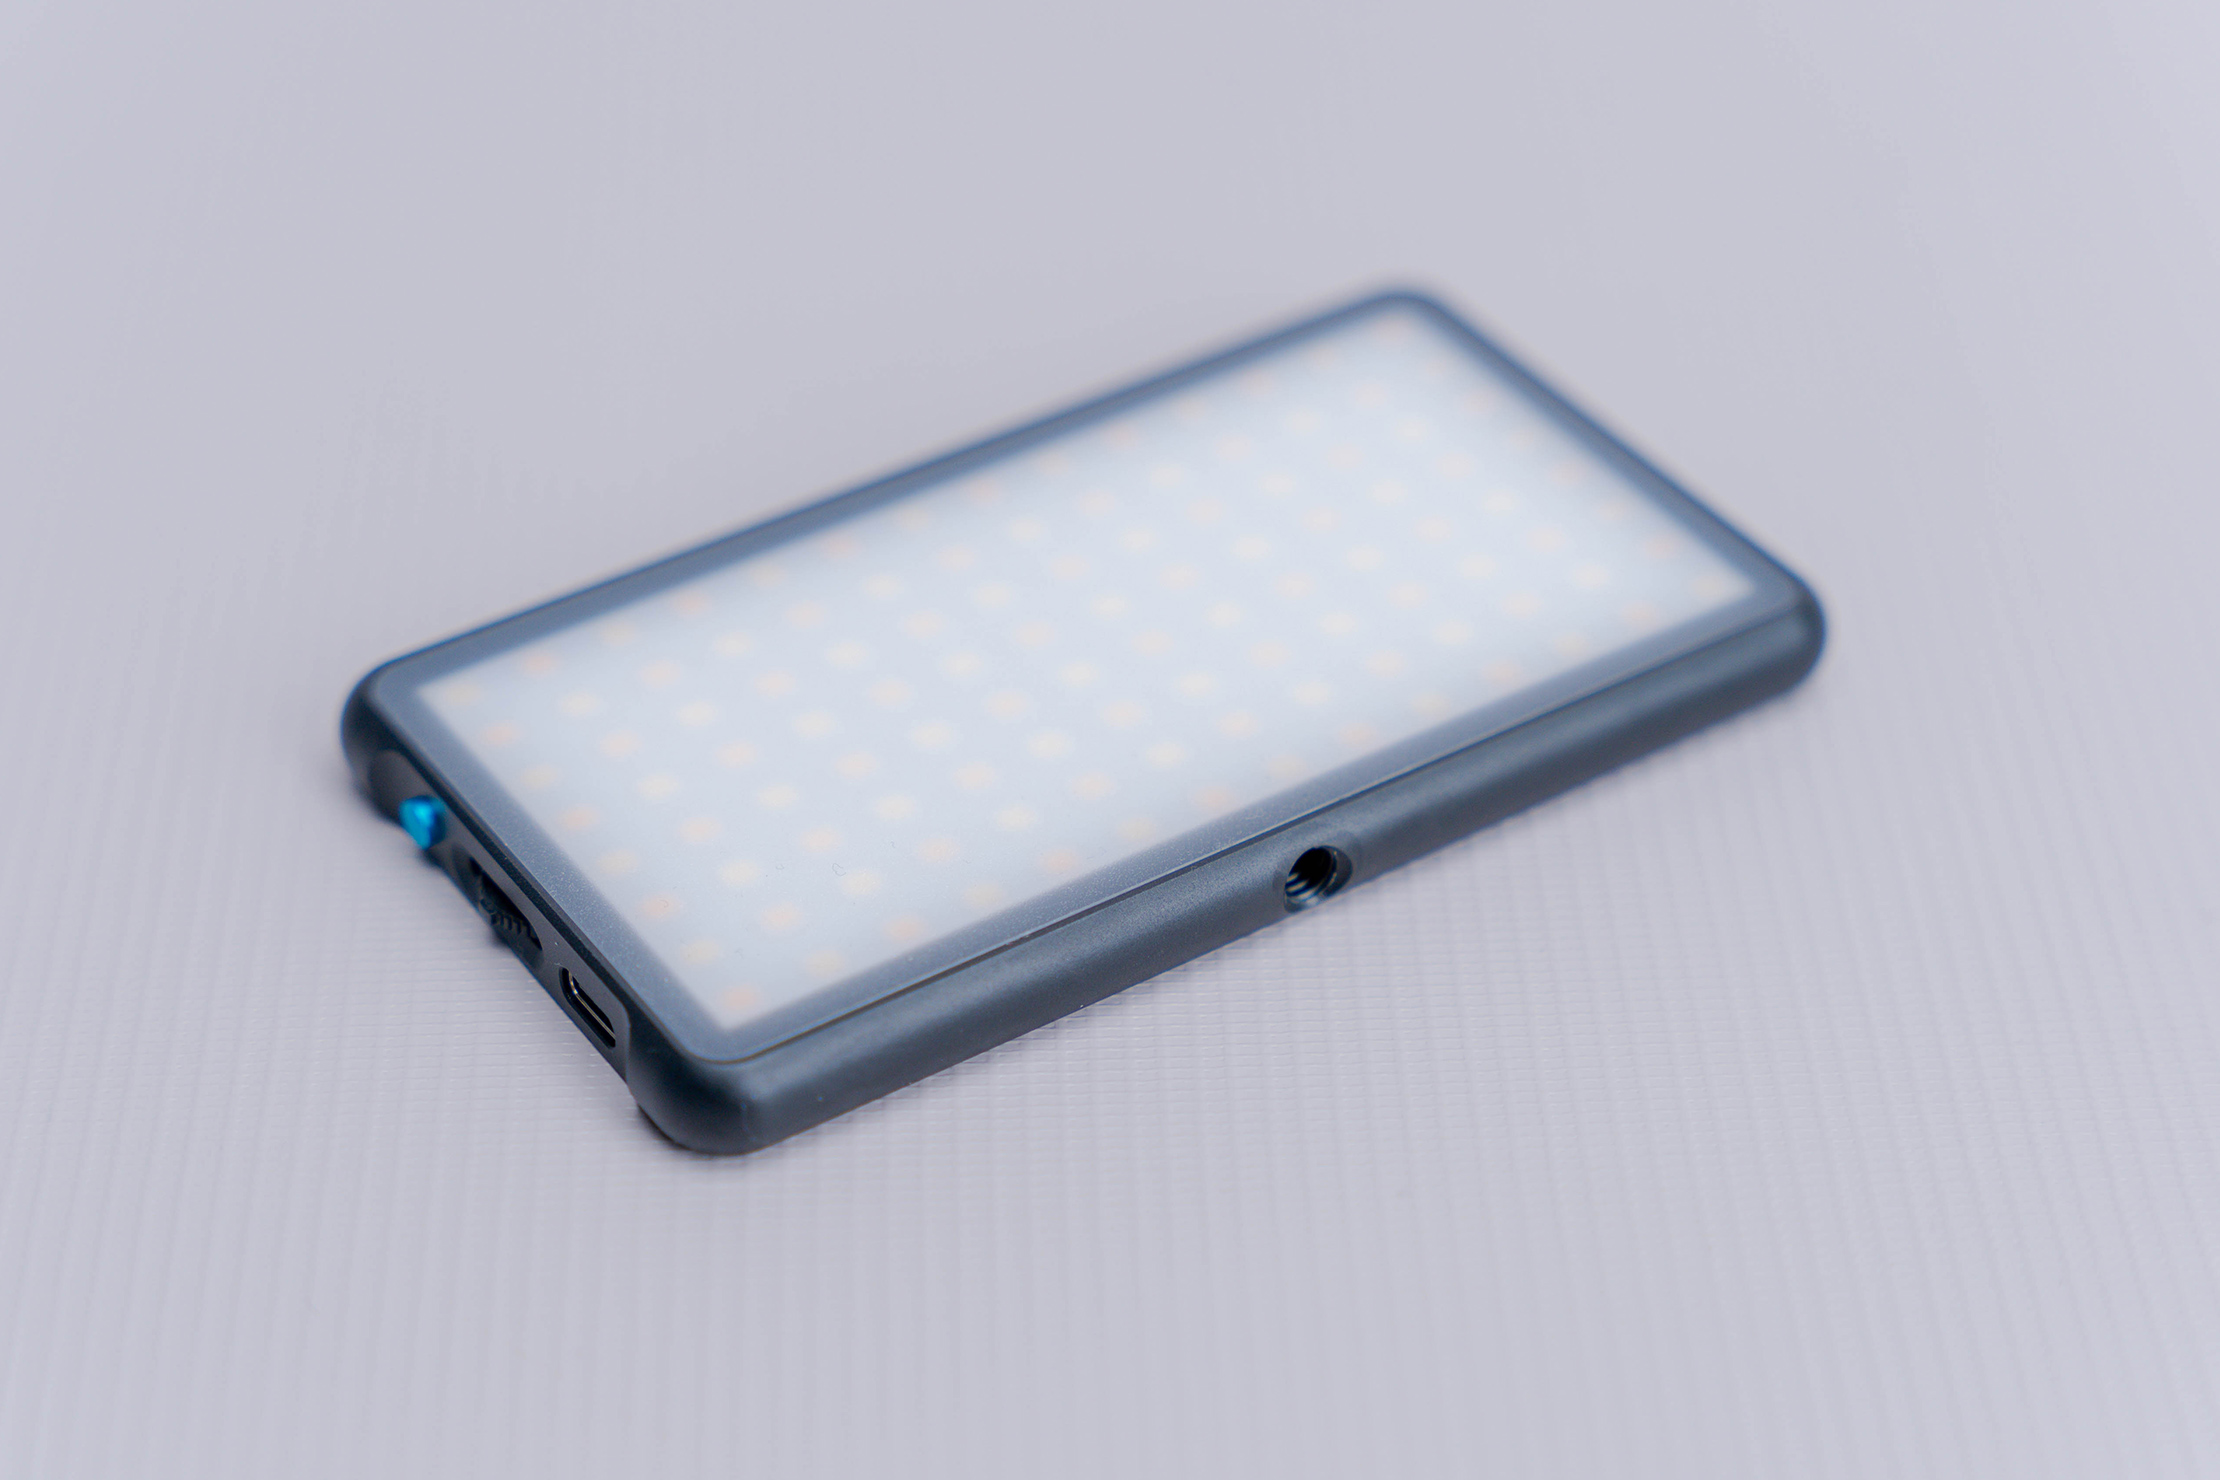
As far as specs are concerned, we have 112 LEDs (if you like math story problems, you already knew this) that each output up to 1000 Lumens. According to Lume Cube, they output 1080 lux at a half meter in tandem with one another, which is pretty powerful for such a small panel.
The bottom and side of the panel each have a standard quarter-inch tripod mount, and they blend in nicely with the bottom of the panel. We don’t notice a huge difference in how the light shines from the panel depending on whether you have it vertically or horizontally oriented.
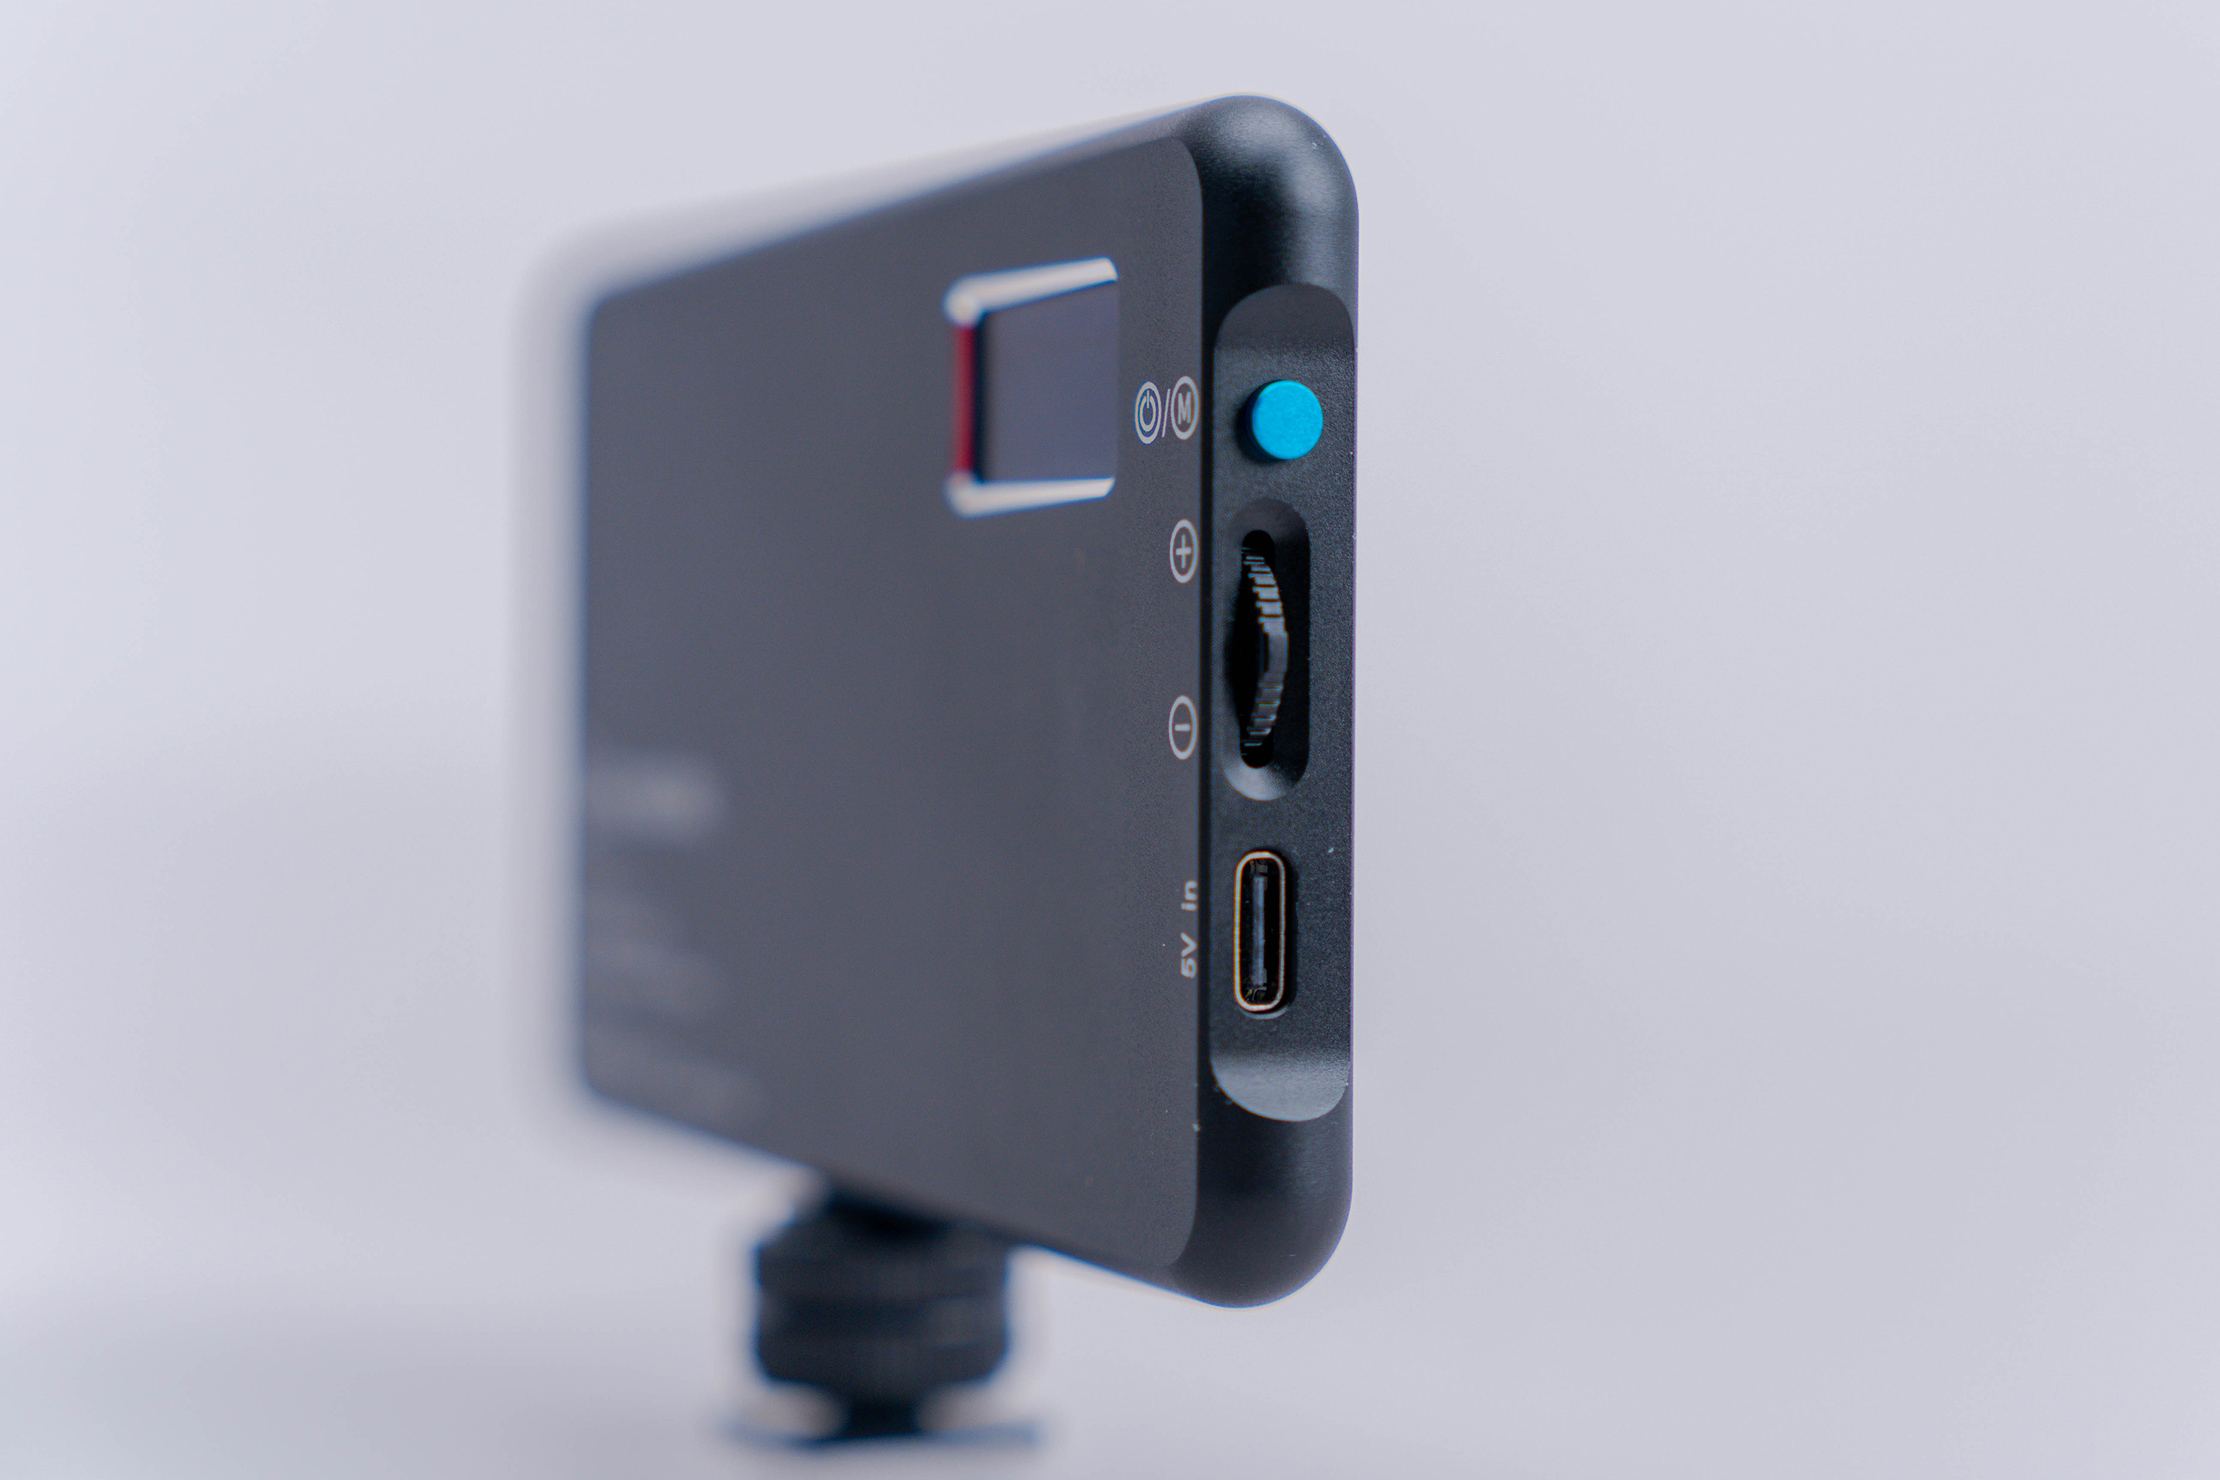
On the top right of the panel’s backside is a small LCD screen. When powered on, there are a few different indicators here.
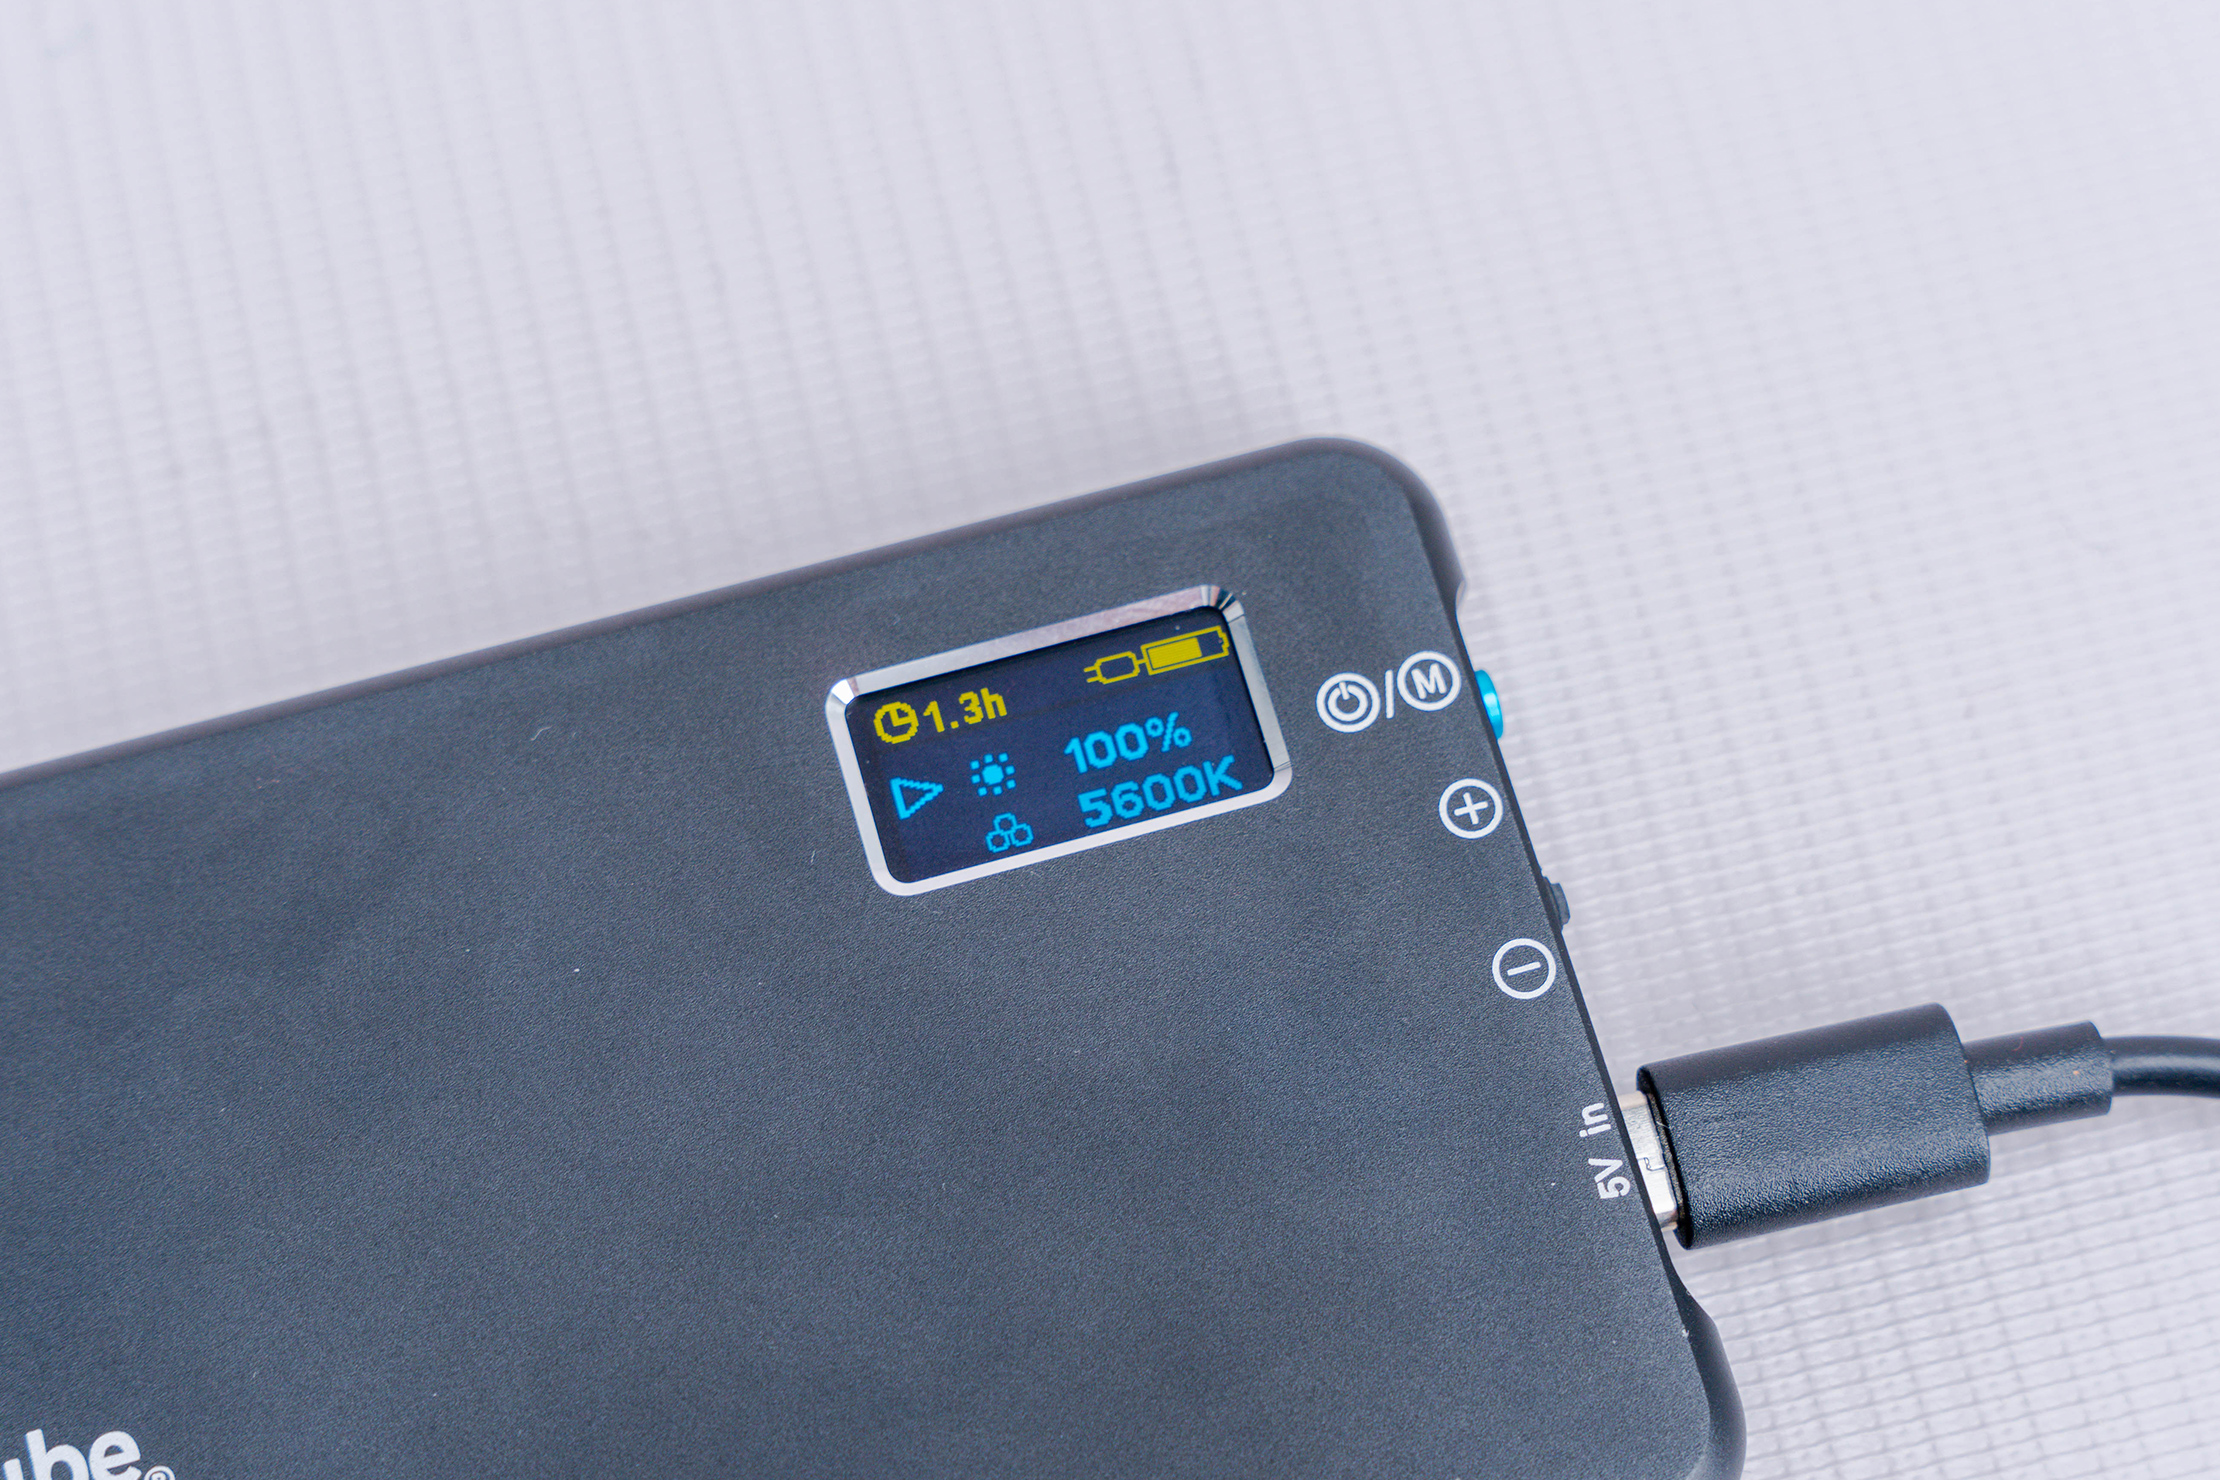
A battery indicator graphic in the top right corner displays how much battery is left. It looks neat, but it’s a little redundant, in our opinion. To the left of the battery is an analog clock with a digital time next to it. This is an estimate of how much battery life you have remaining, corresponding to what settings you are currently using on the panel. Make the light brighter, the time will go down, and vice versa.
Below the battery and time information is a little sun symbol and a percentage. This is an indicator of what percentage the light is currently at. It starts at 1%, then jumps to 5%, and increases by 5s until it reaches 100%.
Below that is a Kelvin reading to indicate what color temperature the light is currently emitting. It starts on the low end at 3,200 Kelvin, which emits a golden-yellow light, and goes all the way up to 5,600 Kelvin, which is more of a white light.
There’s a little play button arrow on the left side toggle between switching the percentage and the temperature. Whichever one it’s pointing to is the one you can currently adjust.
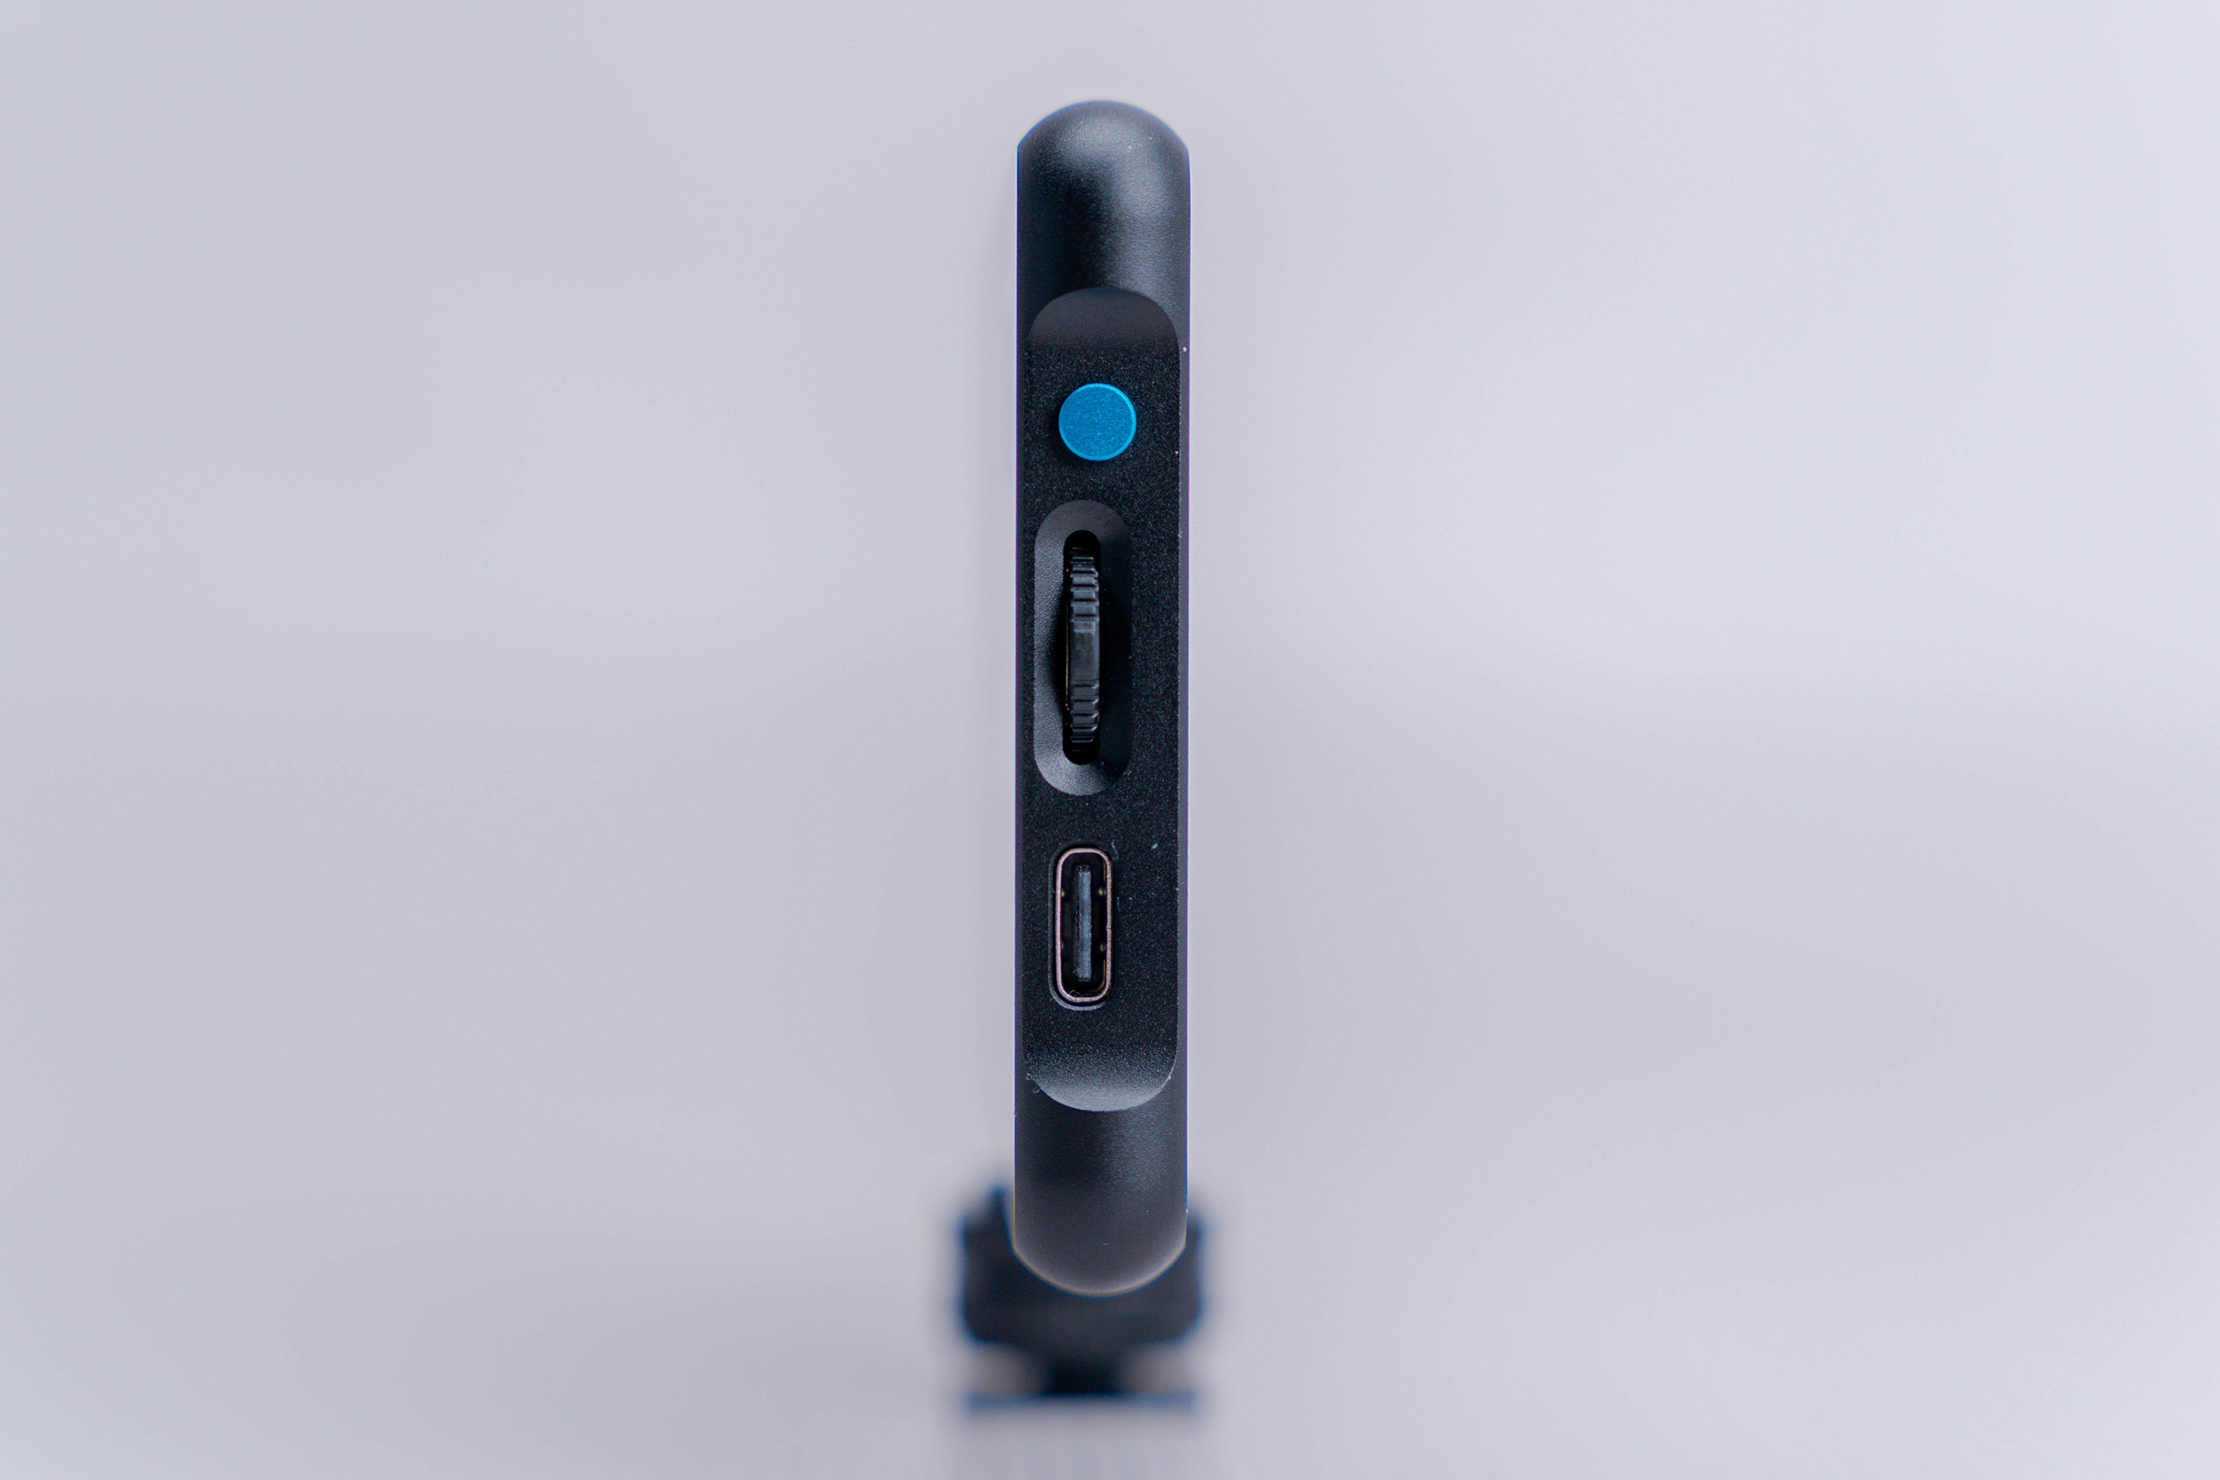
To the right of the LCD screen are four white indicators that correspond to different buttons on the side face of the panel. The top one is a power button and an ‘M’. The button adjacent to it is blue and compresses easily. Holding it down will power the panel on and off, and tapping it while the panel is on will switch between the percentage and color temperature settings.
Below that are plus and minus graphics that are adjacent to a dial. The dial can only move roughly 30° up or down before it reverts back to its center position. Pushing it towards the plus symbol increases the brightness percentage or the color temperature, depending on which setting you are currently adjusting. Pushing it the opposite way towards the negative symbol decreases the brightness percentage or color temperature.
The dial is extremely easy to use but did accidentally get hit a few times, leading to the brightness or temperature being slightly off between shots. This isn’t a huge deal in most situations, but if you need continuity, it’s important to keep track of your settings to ensure they don’t change accidentally.
Below the dial is a USB-C charging port. We love the use of USB-C here instead of something older like a micro-USB because we typically already have a USB-C cable with us to charge our MacBook or cell phone, so we don’t need to bring an additional cable.
If the panel is out of juice, you’re able to run it from the USB-C cable, which is a nice addition. Instead of waiting for it to charge up, plug it in using a nearby outlet or portable charger.
The USB-C cable that comes with the panel is durable and roughly 40 inches (101.6 cm). Including one in the package may be redundant for those who already use them, but for those who are just now joining the USB-C revolution, it’s a nice first cable.
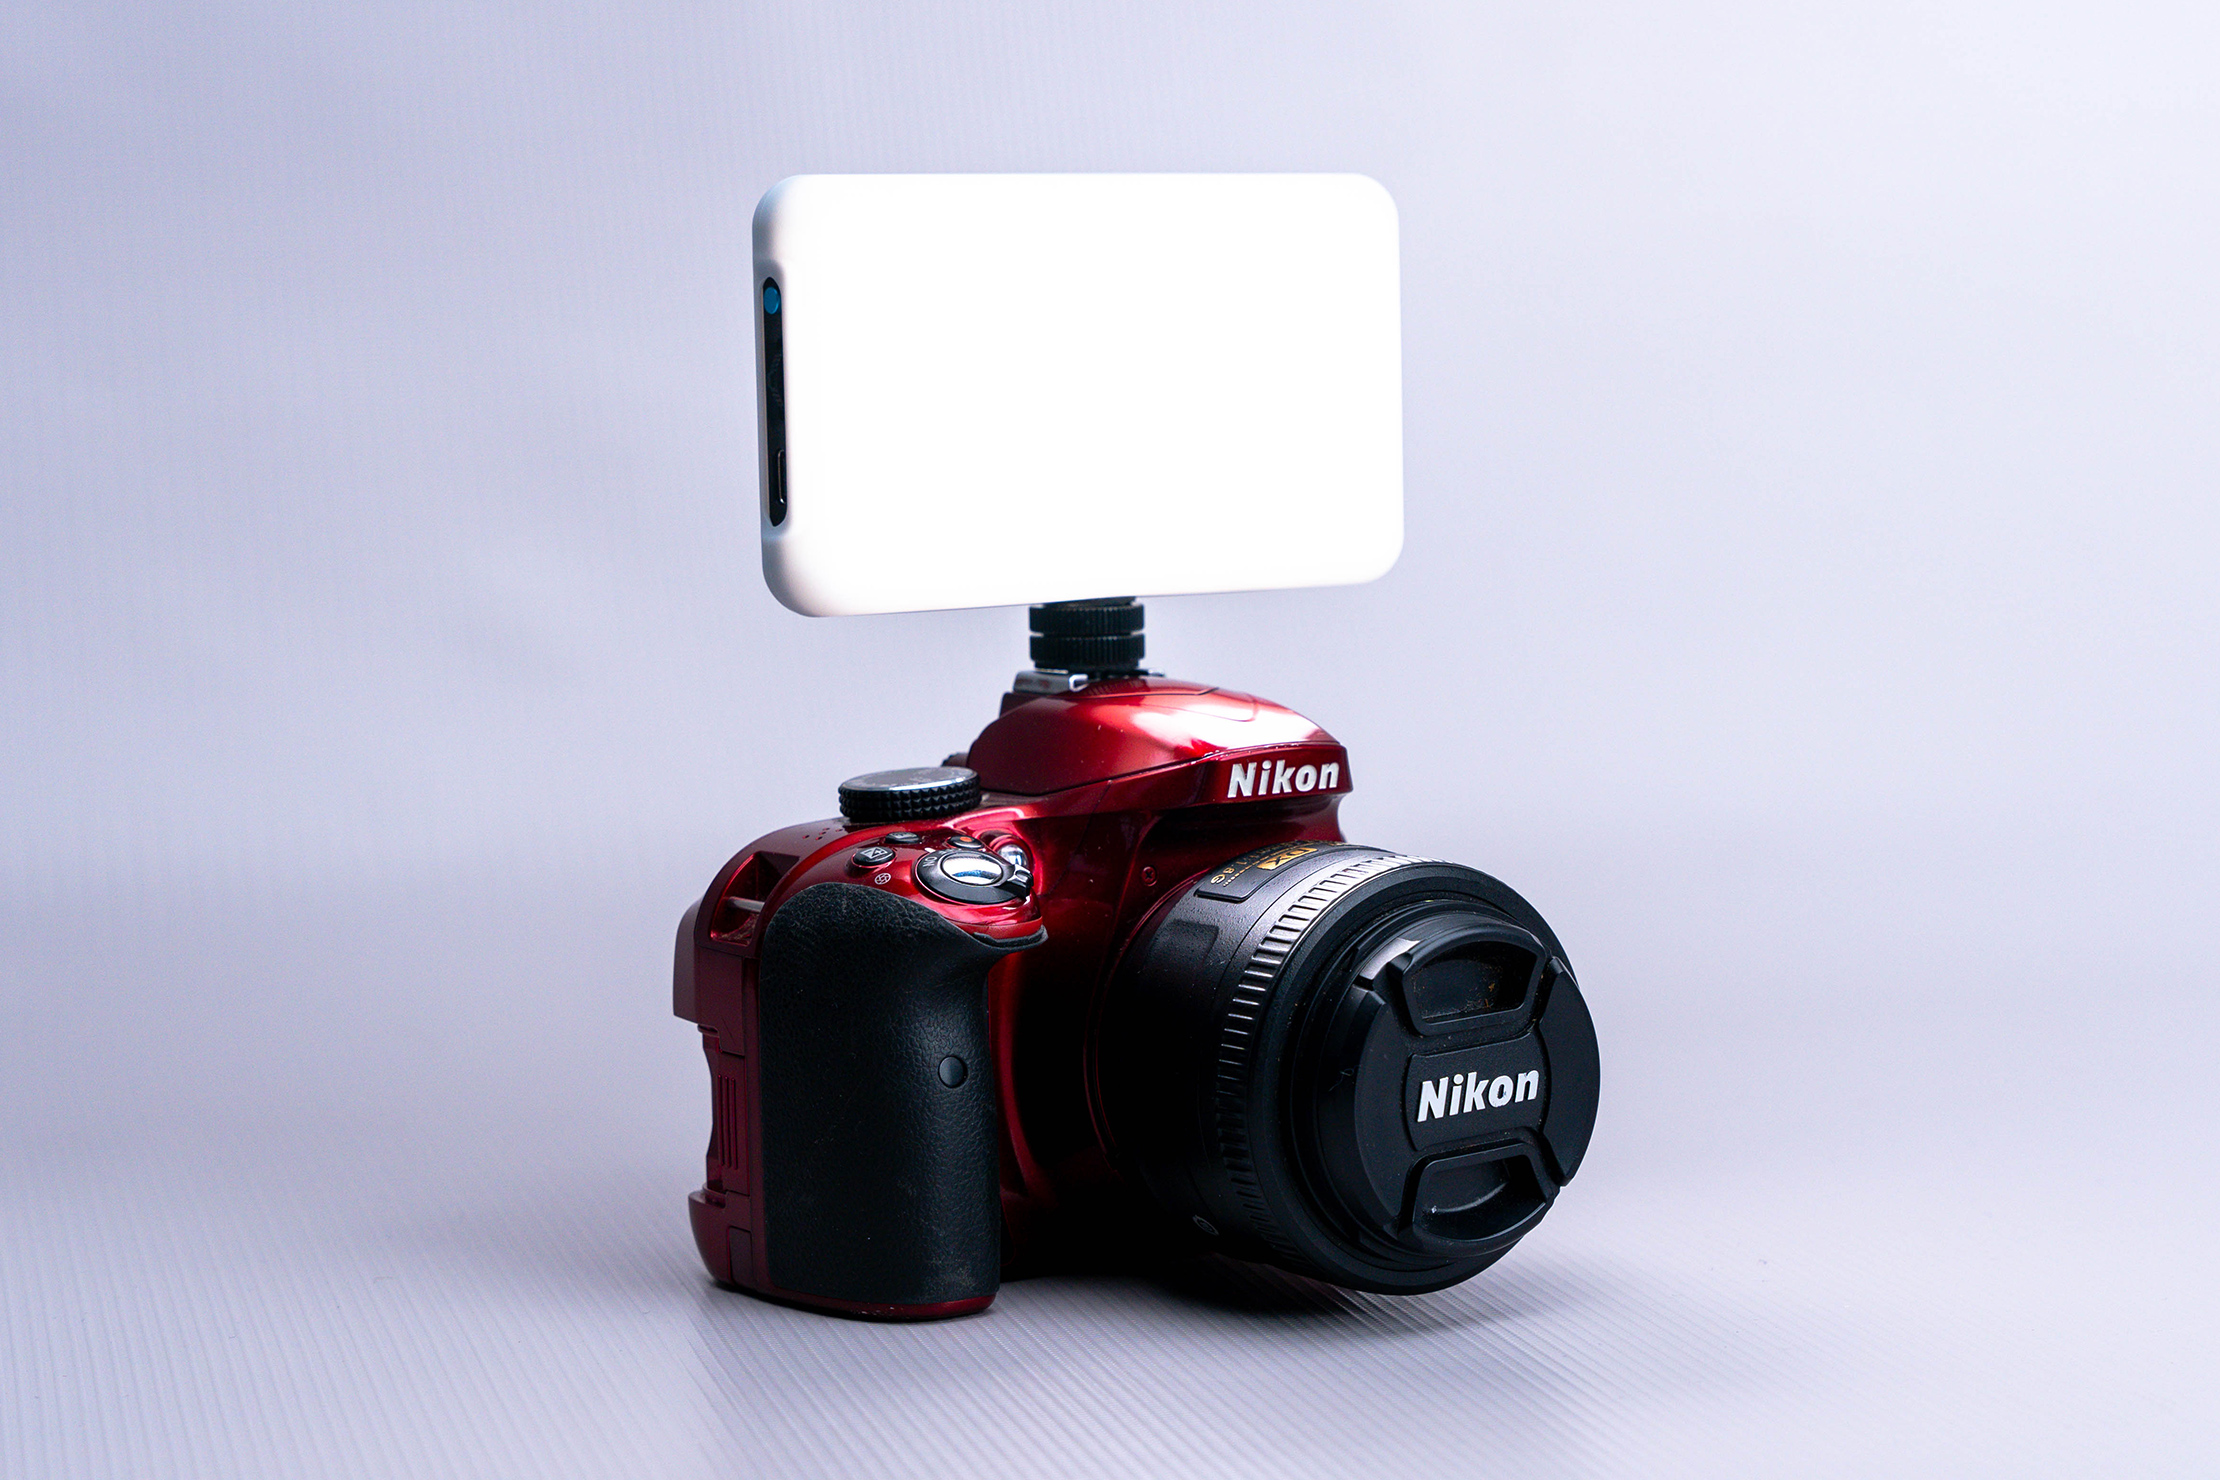
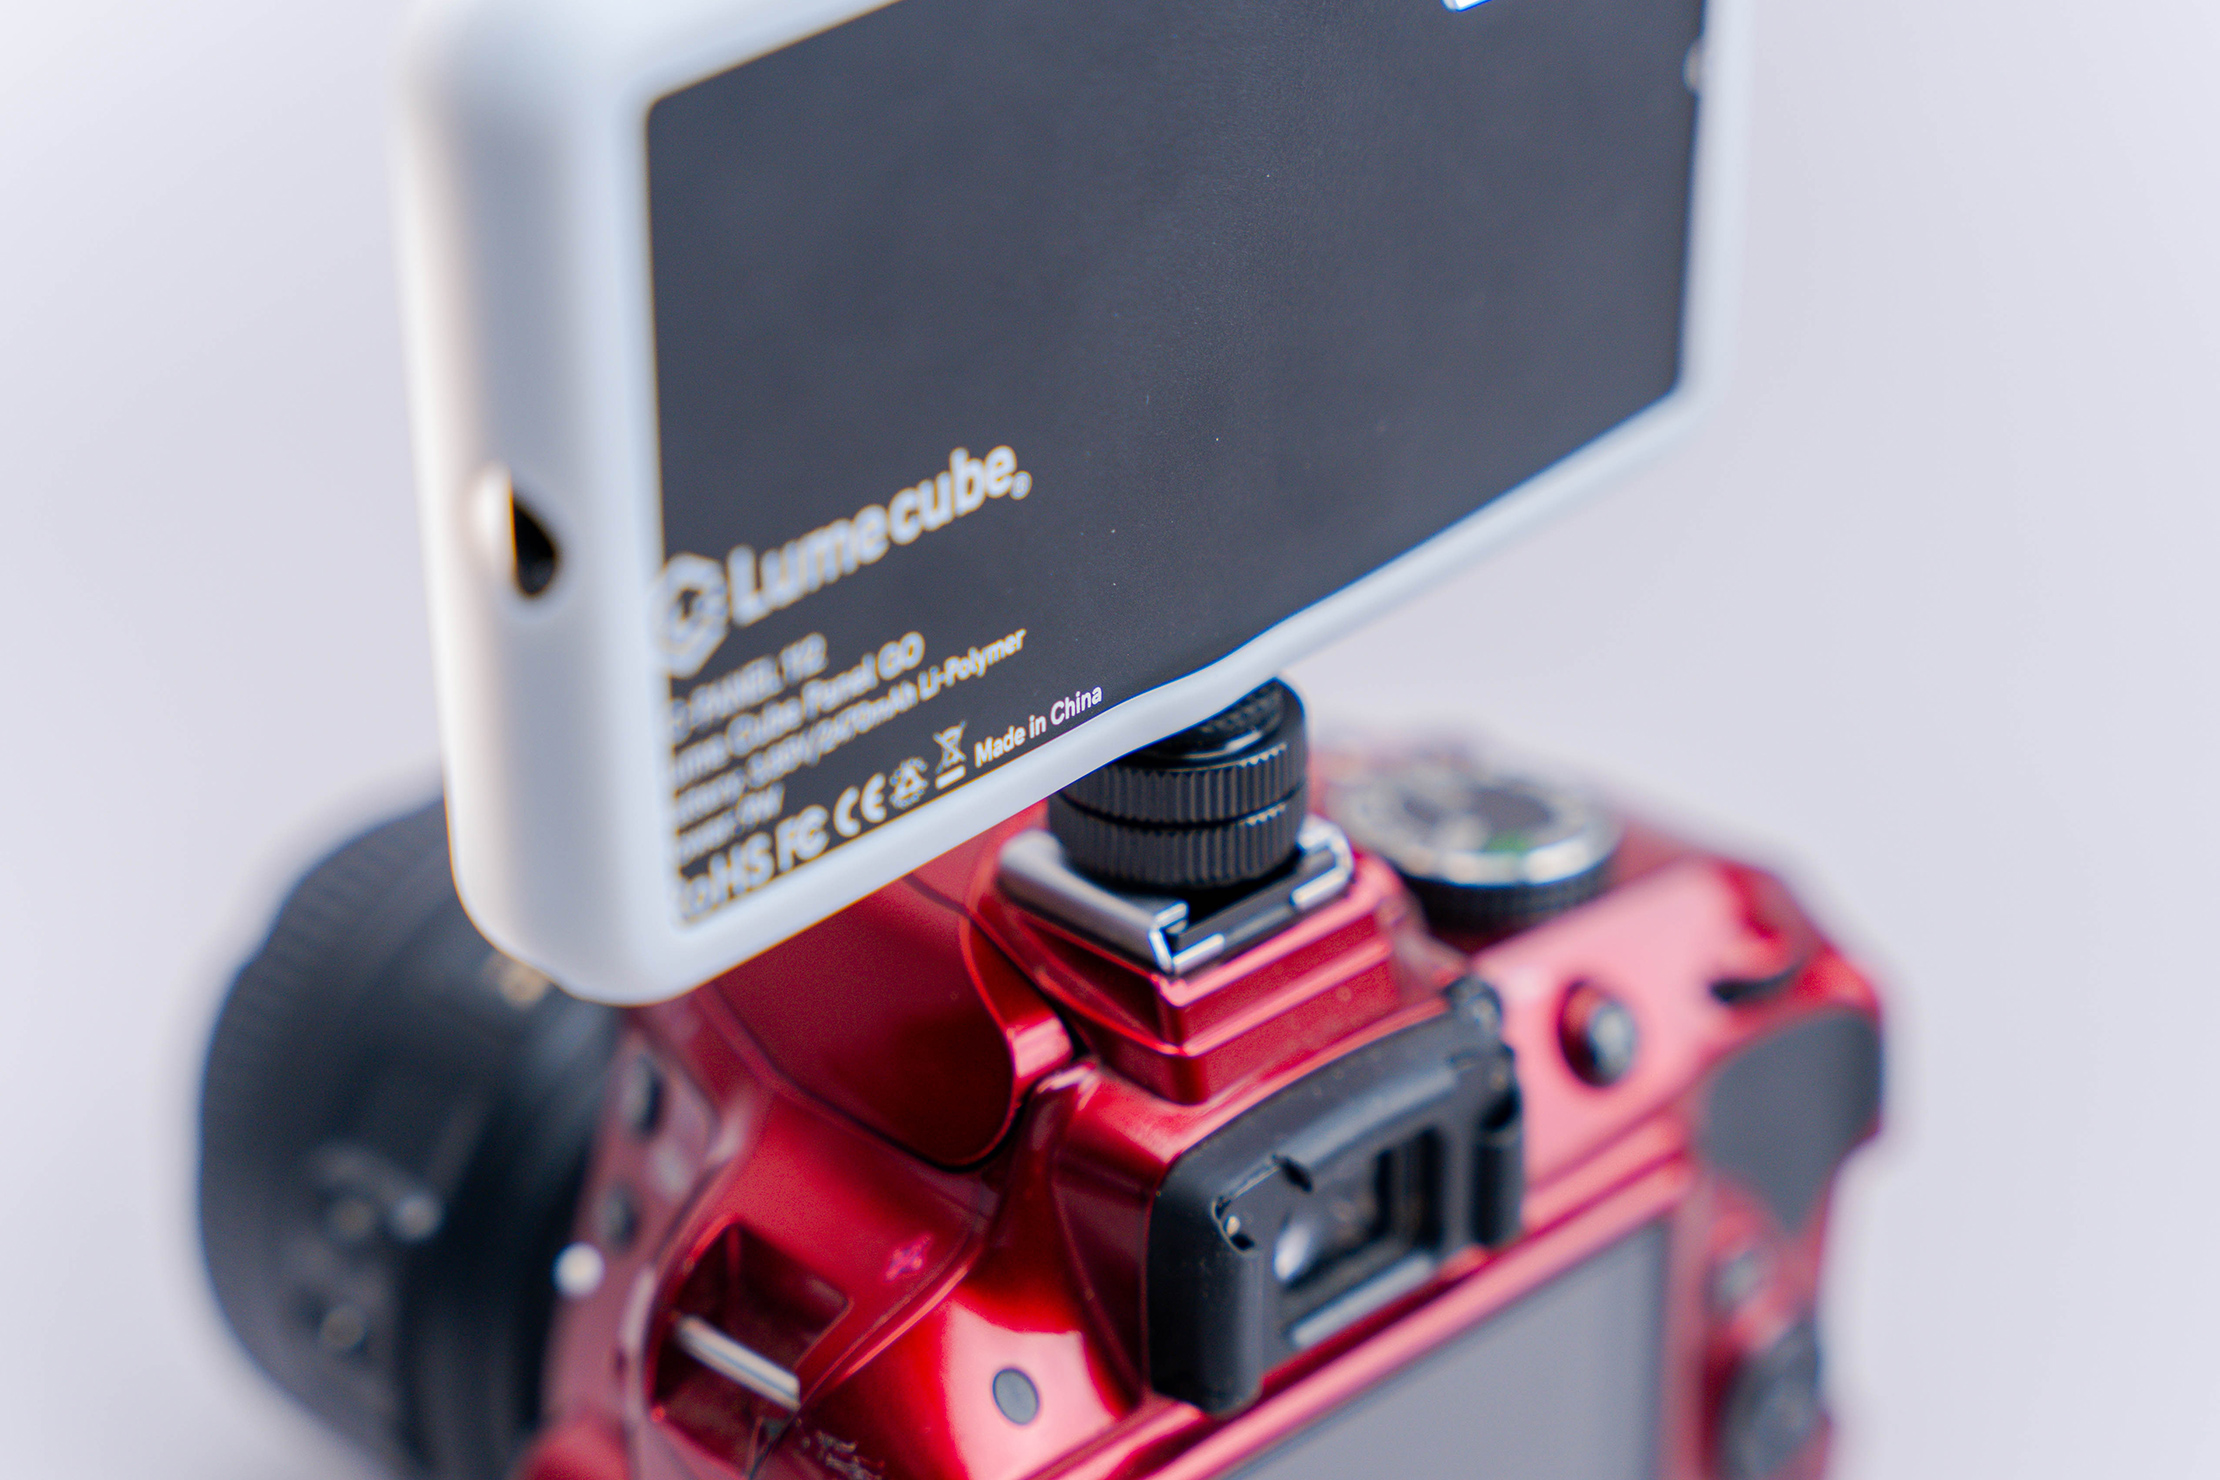
There’s also a hot shoe mount to attach the panel on your DSLR or mirrorless camera. It’s black and crafted from light metal, but it feels durable. Below the screw is a little piece of plastic padding, which adds a small cushion between the panel and the metal piece. If you really tighten it on, this piece of plastic begins to come loose. There isn’t much you can do about it, so be wary when screwing the panel on. If the plastic piece were to go missing, the metal-on-metal could scuff up the matte finish on the panel.
The bottom of the mount slides easily onto a hot or cold shoe, and there’s a little spinning adjuster to tighten it down so the light doesn’t slide off. Once tightened, this can be a little hard to loosen. It has texture, but it’s small and there isn’t a ton of room to get your hand in there to adjust it. We’ve always been able to get it in the end, but it can be a little frustrating.
The last thing included with the panel is a rubbery softening diffuser. It’s white and is crafted from soft plastic that feels nice to hold. It reminds us of the old school phone cases that were all the rage in the mid-to-late 2000s. If you didn’t have a plastic case on your LG Dare with the little circle cut out for the 3.2-megapixel camera in 2008, you simply weren’t cool. Don’t worry, none of us had one, either.
The diffuser works well to spread the light and make it a little less harsh, especially up close. Whereas we do use it for that purpose, we like it more for another reason: protection. It’s such a small panel that it can fit almost anywhere and the plastic diffuser acts as a case to protect the panel if your journey goes off the beaten path. It protects the plastic front panel of the light, too, which is the only area we’re worried about in terms of durability. It has holes in the sides for the tripod mounts, so that way you can still mount it when the diffuser is on.
Usage & Features
So now that we’ve gone over the specs and what comes in the box, let’s talk about what we can use it for and how it performs at those tasks.
We love unpredictability while traveling. Often times the best experiences are those we don’t anticipate. Being prepared to handle any situation enables us to go into unpredictable adventures with ease. As far as travel photography is concerned, having a way to get more light in a scene no matter the weather, time of day, or environment is key to capturing images that encapsulate the essence of where you are, the people you’re with, and why you travel in the first place.
Now, you might be wondering, what does all of that have to do with the Lume Cube Panel Go? Well, more than you might think.
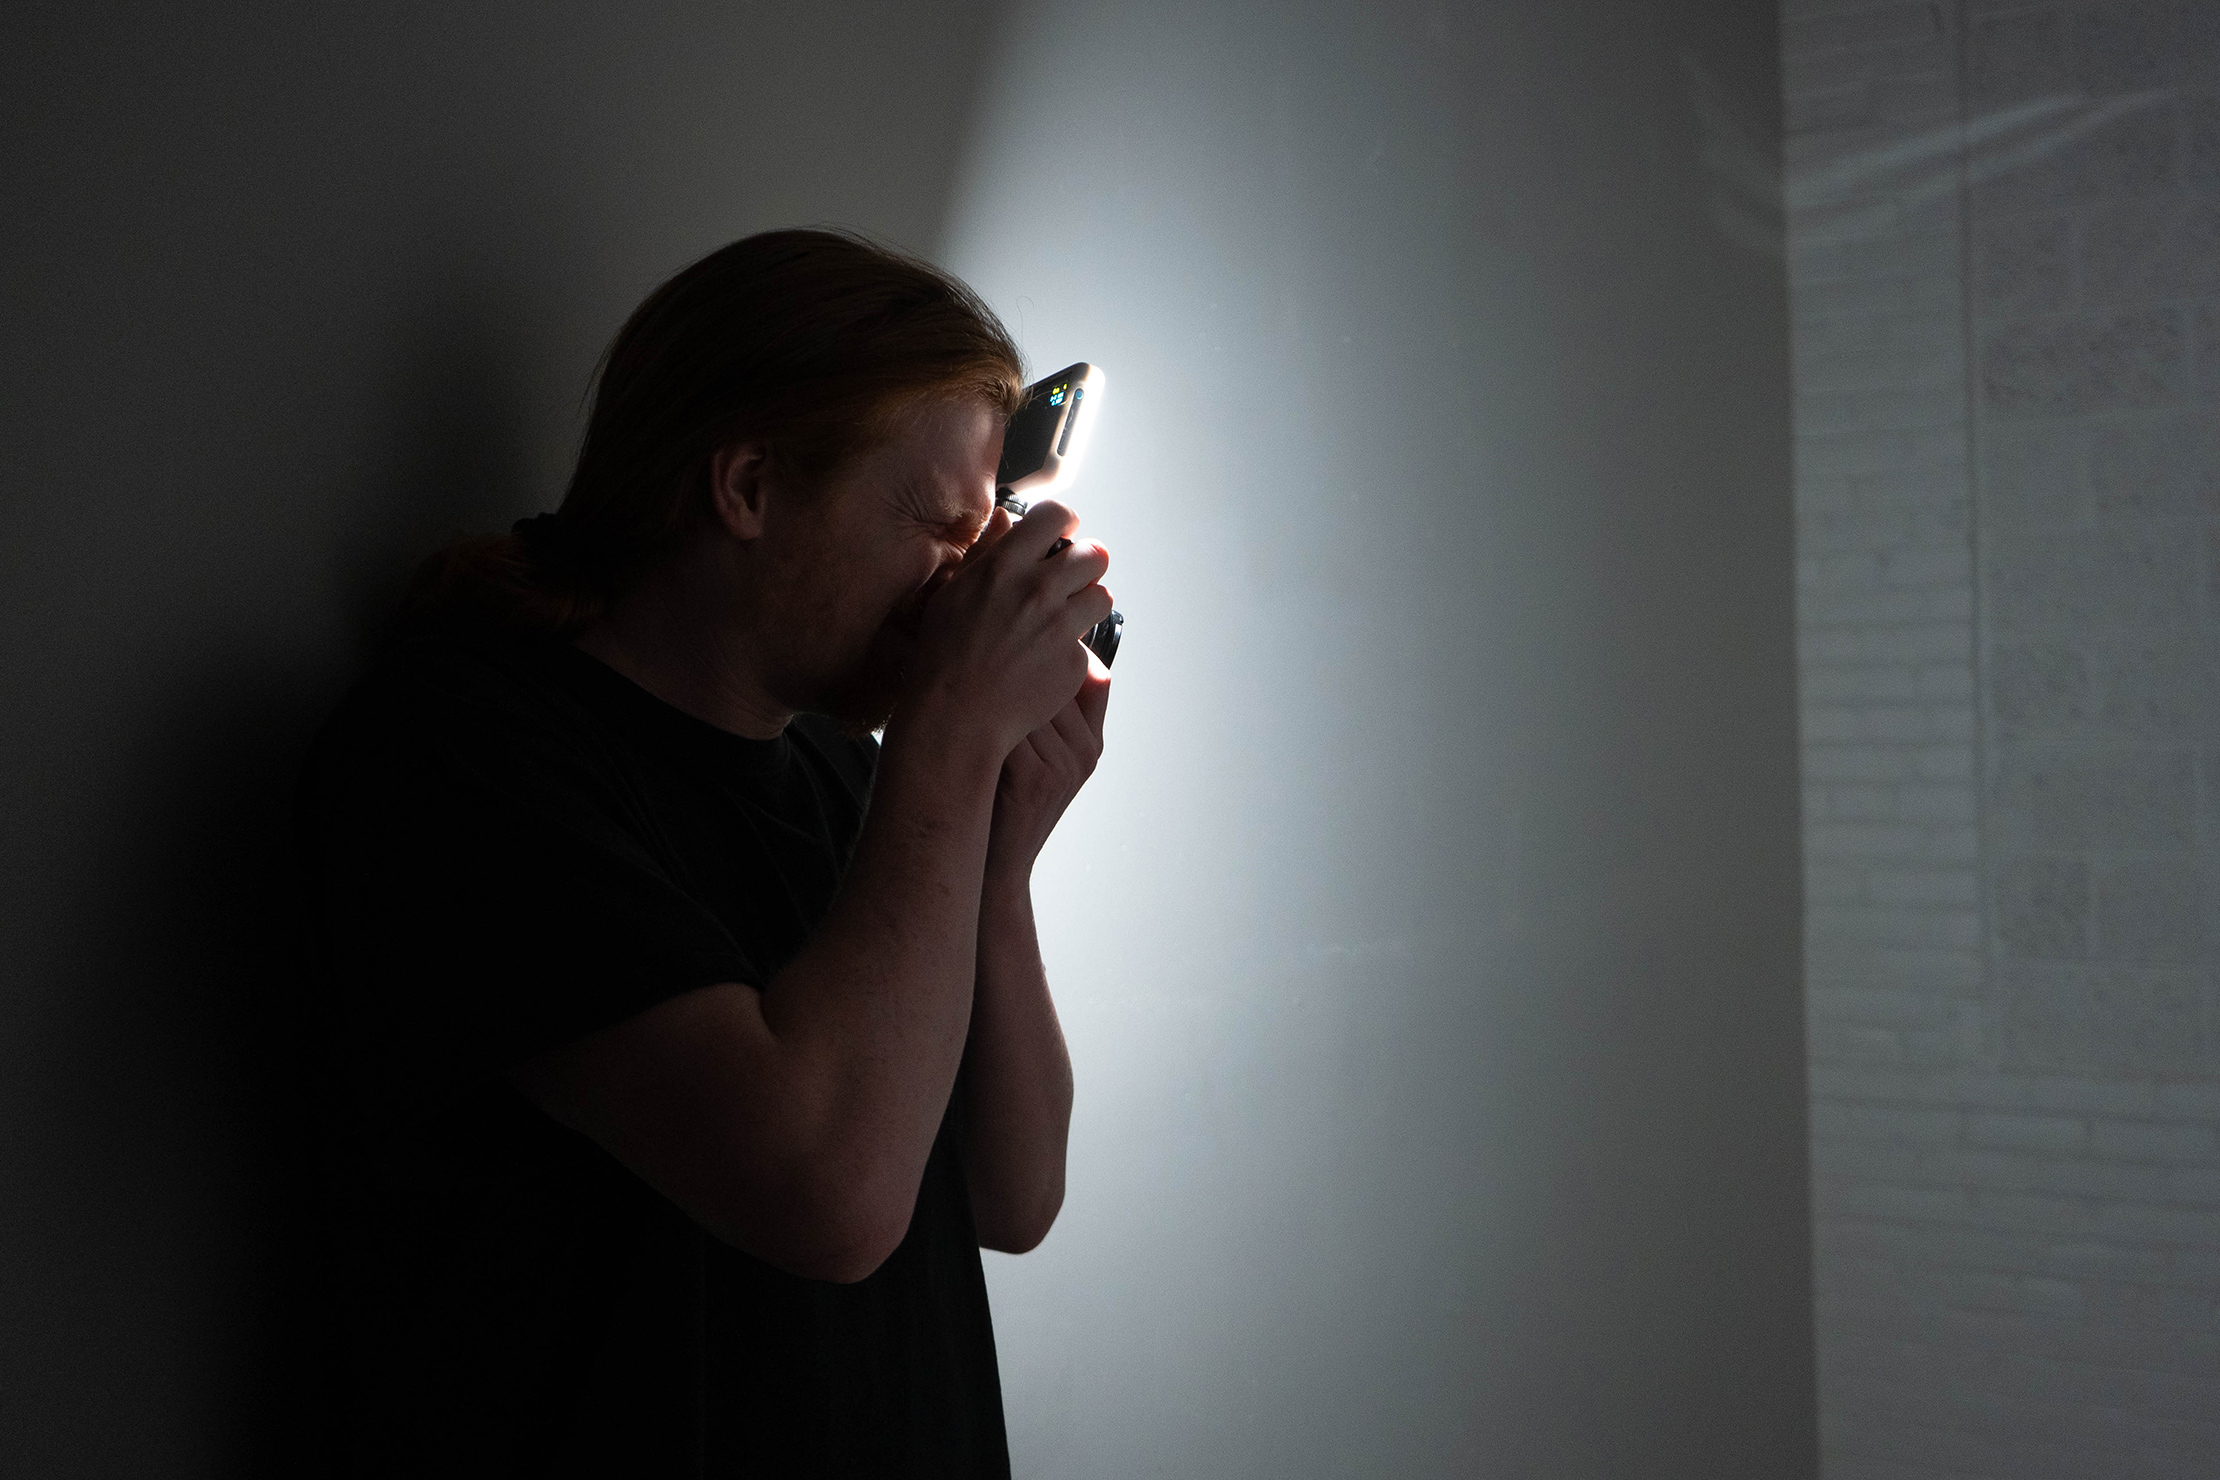
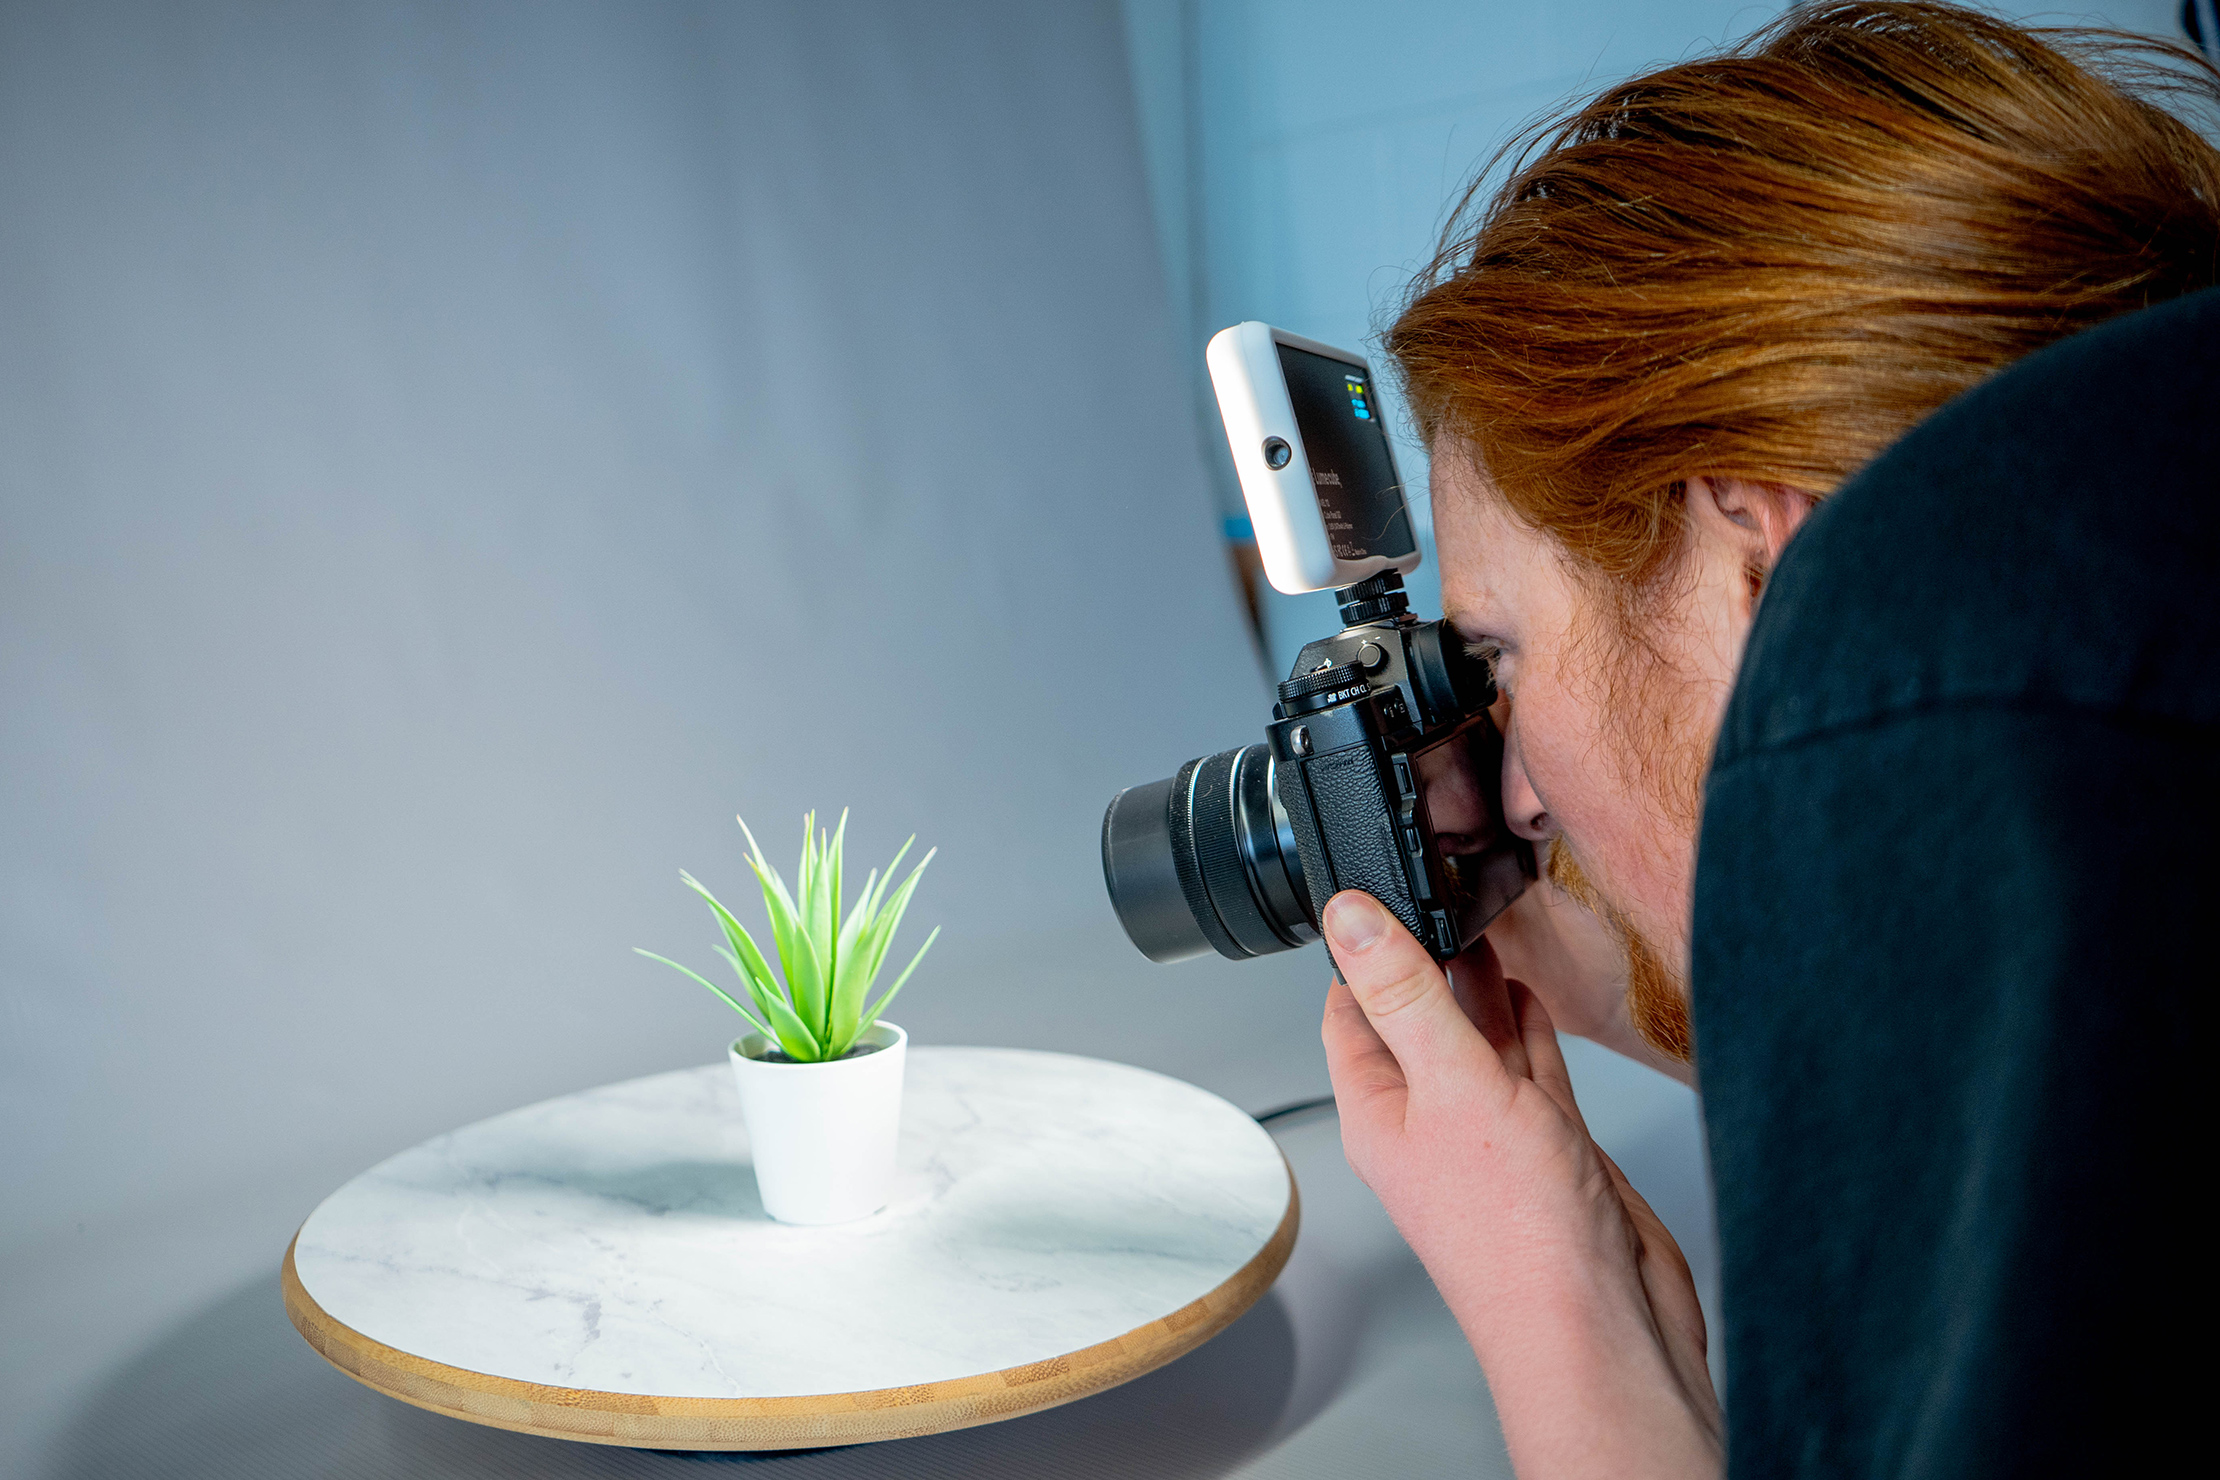
We love using the light as a focusing aid when making macro images of old buildings, architectural details, or tiny characteristics of plants and flowers. The light is a lot brighter than our phone flashlight, and if we need an extra hand it can be attached to the hot or cold shoe. Turn the light on to brighten your subject and focus the image; then, turn the light off and snap away. This helps ensure that your macro photography is as sharp as possible.
We enjoy long exposures as much as the next friendly gear review company, but sometimes they can be a little too long for our liking. In dark old buildings, dingey tight alleys, and other not-so-bright places, exposure times can often creep past 30 seconds. With an exposure this long, other forces of nature come into play, like people walking through the scene, accidental tripod bumps, or random lights flashing through the image in unflattering ways. By adding a bit of artificial light, we can shorten our exposure time to ensure that the odds of outside interference are smaller.
While traveling, taking photos of our family and friends in new and unique places is an easy way to remember where we went and who we went with. After the sun goes down, taking photos of people can be a bit harder as light is harder to come by. If you brought the Lume Cube Panel Go along, you could remedy this issue. Even small amounts of light can add enough to take a photo worthy of showing off to your followers on Instagram or posting on Facebook just for the aunt you haven’t seen in 10 years to comment telling you to cut your hair.
One issue we have come across while using the light in the field arises while using larger lenses. Typically we think that longer focal length lenses are larger, but many modern wide-angle lenses are just as large and in charge as the telephoto lenses of yesteryear. If you have the Lume Cube Panel Go mounted using the included hot shoe mount and it isn’t high enough to clear the end of the lens or the lens is too wide, it can cast a gnarly shadow that looks a little funky. We combat this by raising the light, but that isn’t always the easiest thing to do.
On their website, Lume Cube says that the Panel Go will last up to 16 hours at 1% power and up to 1.3 hours at 100% power. We haven’t tested it at 1% power as we feel it would be a little wasteful, especially since we cannot figure out why anyone would need 16 hours of minimal light. We were able to test it at 100%, though, and it lasted 1 hour, 11 minutes, and 36 seconds, which is roughly 1.2 hours.
If the light is too big for your needs or you don’t need something so bright, Lume Cube also makes a Panel Mini which is roughly half the brightness. If you need a little more light and size isn’t an issue, opt for the Panel Pro. It’s about 50% brighter and can change to any color imaginable using their BlueTooth app. This might be overkill for some, but it does look like a lot of fun if you can spare the space.
The Lume Cube Panel Go is a piece of gear that you won’t be angry with yourself for not bringing until you don’t. Odds are, you won’t need it on every trip, but if you don’t bring it along, there will be a perfect shot you may miss because you didn’t have that extra bit of light. As photographers, we have to make do with what we have on hand, but considering the small size and usability this light offers, we feel it’s a good include for just about any trip you might be taking with your camera in hand.
Usage Timeline
Condition: Excellent
- Battery lasts over an hour on the highest setting
- Buttons are easy to manipulate
- Tripod mounts can scratch the bottom of the light
Shop, save, and get geared up on Memorial Day deals! Check it out →


Get your questions about the Lume Cube Panel GO answered from our team and the Pro Community right here on the page. Plus, join discussions with other members about gear, guides, and more.
Join Pack Hacker Pro or, Sign In